How to Draw Winter Scarf (Step-by-Step Easy Guide)
Are you ready to get creative? Winter is such a magical time of year. The air gets chilly, snowflakes dance in the sky, and we get to bundle up in our warmest, fluffiest clothes. And what is the absolute best accessory for winter? You guessed it a Scarf.
Drawing a scarf might sound simple, but did you know there are so many ways to make it look cool, cute, and colorful? Whether you want to draw a scarf floating in the wind, wrapped around a snowman’s neck, or just folded neatly, this guide is going to teach you everything you need to know.
Grab your pencils, get comfy, and let’s dive into the cozy world of winter art.
Getting Ready for Art Adventure
Before we start drawing lines, we need to gather our supplies. A chef needs ingredients to cook, and an artist needs tools to create.
Your Art Toolbox
You don’t need fancy supplies. Here is what works best:
- A Pencil: This is your magic wand. Use a standard HB pencil or a mechanical pencil.
- An Eraser: Mistakes are just happy accidents. A good white eraser helps you fix things easily.
- Drawing Paper: You can use a sketchbook, printer paper, or even the back of a notebook.
- Black Marker (Optional): This is for “outlining” later to make your drawing pop.
- Colors, Crayons, colored pencils, or markers. The more colors, the better.
How to Draw Winter Scarf (The Basic Steps)
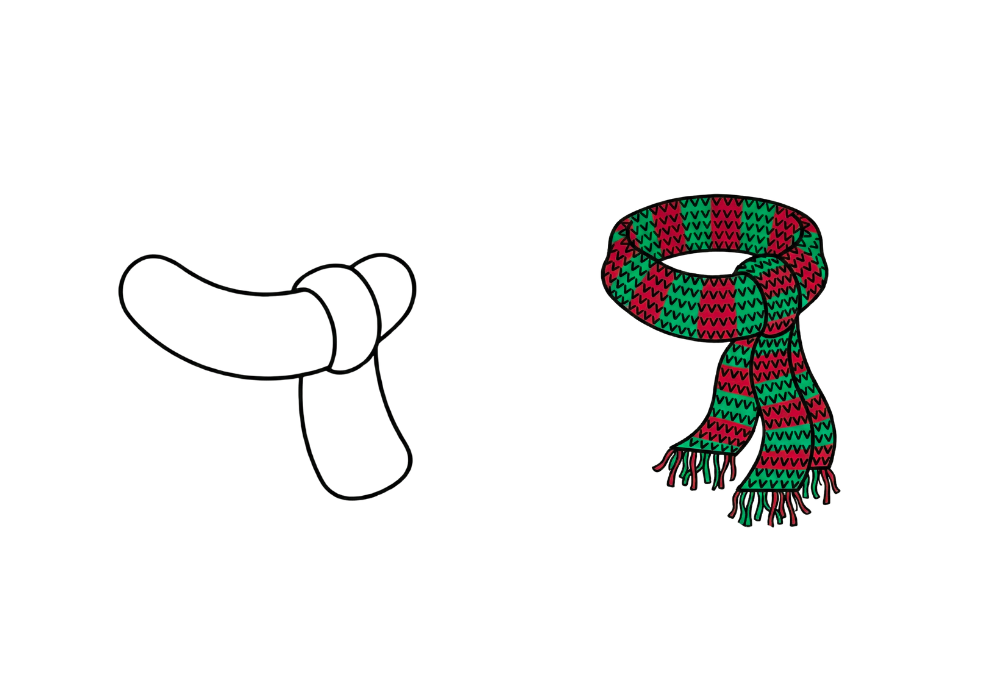
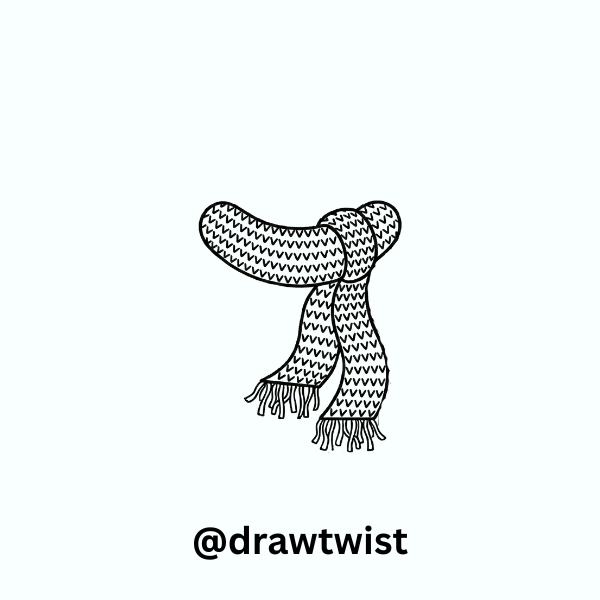
We are going to draw a classic “wrapped” scarf. Imagine it is wrapped around an invisible neck, with two ends hanging down.
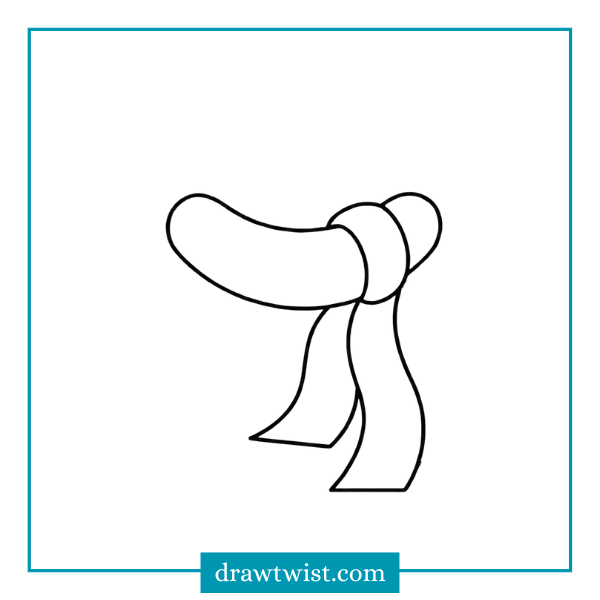
Step 1: The Curved Neck Piece
First, we need to draw the part of the scarf that hugs the neck.
- Draw a gently curved line that looks like a smile
). - Draw another curved line right below it, but make this one curve the opposite way slightly, connecting the ends.
- It should look a bit like a curvy sausage or a thick banana lying on its side. This is the part that keeps the neck warm.
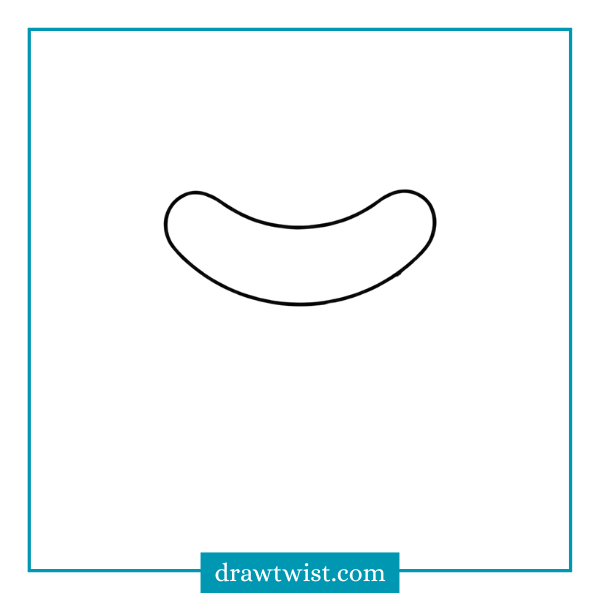
Step 2: The Knot (The Overlap)
Scarves usually overlap where they tie together.
- On one side of your “sausage” shape, draw a short, curved line coming down.
- This makes it look like one piece of fabric is tucked over the other.
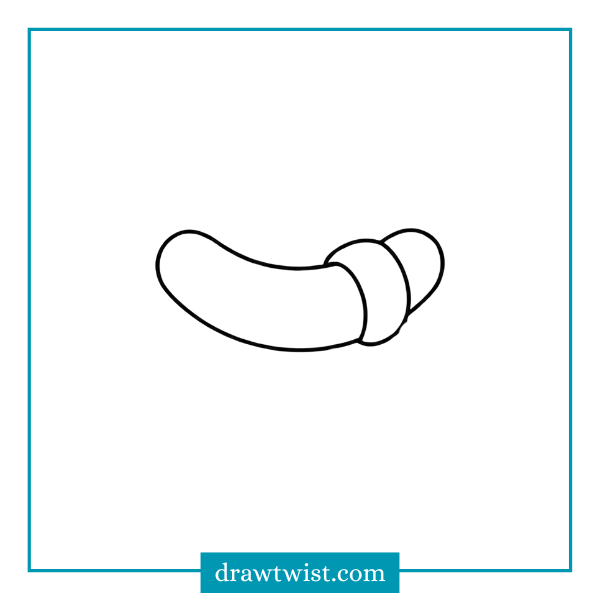
Step 3: The First Tail (Hanging Down)
Now, let’s draw the long part of the scarf that hangs down.
- Start from the bottom of your neck piece (on the left or right side).
- Draw two long, wavy lines coming down. They don’t have to be straight. Wavy lines make the scarf look soft and fabric-like.
- Connect the bottom of these two lines with a straight line. Now you have one tail.
Step 4: The Second Tail
A scarf usually has two ends, right?
- Draw a second tail peeking out from behind the first one.
- Make this one a little shorter or pointing in a slightly different direction to make it look natural.
- Close the bottom with a straight line.
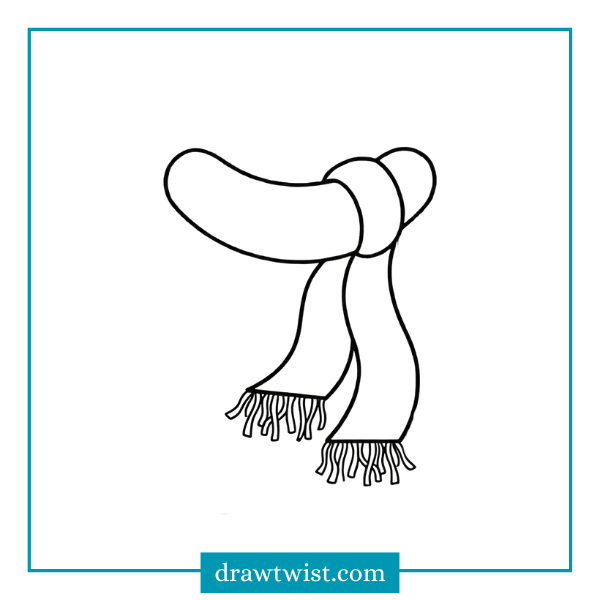
Step 5: Adding the Fringes (The Fun Part)
What is a winter scarf without those dangly bits at the bottom? These are called fringes (or tassels).
- Go to the bottom straight edge of your scarf tails.
- Draw lots of little rectangles or simple lines hanging off the edge.
- Make them messy. If they are too perfect, they look like plastic. If they are messy, they look like yarn.
Coloring Like a Pro
Coloring is where your drawing comes to life. Let’s learn a little bit about “Color Theory” (don’t worry, it’s easy).
Warm vs. Cool Colors
Artists group colors into two teams:
- Warm Colors: Red, Orange, Yellow. These remind us of fire and sun. They feel cozy and energetic.
- Cool Colors: Blue, Purple, Green. These remind us of ice, water, and snow. They feel calm and chilly.
Which should you choose?
- If you want your scarf to look like it is super warm and toasty against the cold snow, use Warm Colors.
- If you want your scarf to look icy and magical (like Elsa), use Cool Colors.
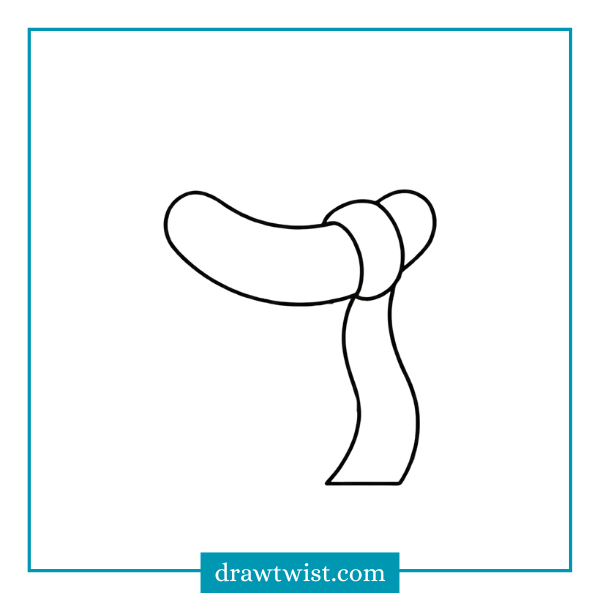
Designing Your Scarf (Patterns & Decorations)
Now you have the outline of a scarf. Great job! But right now, it’s just a plain white cloth. We need to make it stylish. Here are 5 Easy Pattern Ideas you can try.
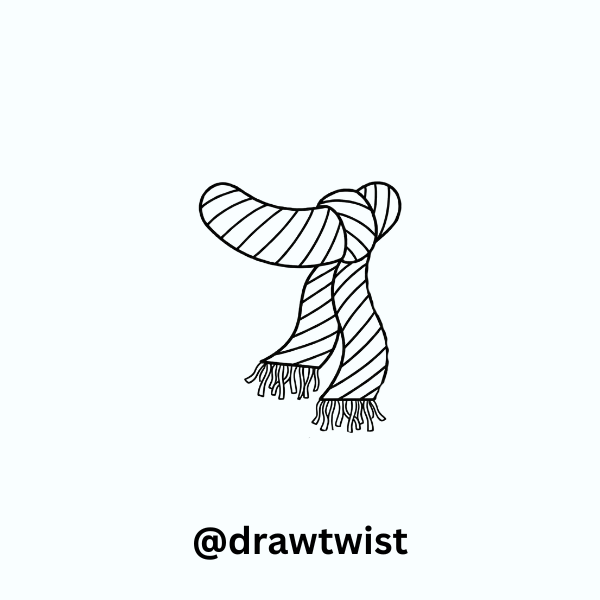
Pattern Idea 1: The Candy Cane Stripe
This is the easiest and most festive pattern.
- How to do it: Draw diagonal (slanted) lines all the way down the scarf tails and across the neck piece.
- Coloring Tip: Use Red and White for a Christmas look, or Blue and Silver for a winter wonderland look.
Pattern Idea 2: Polka Dots
Polka dots are fun and playful.
- How to do it: Draw small circles all over the scarf. Be careful not to draw them too close together.
- Pro Tip: Draw some circles going off the edge (so you only see half a circle). This makes the drawing look 3D and professional.

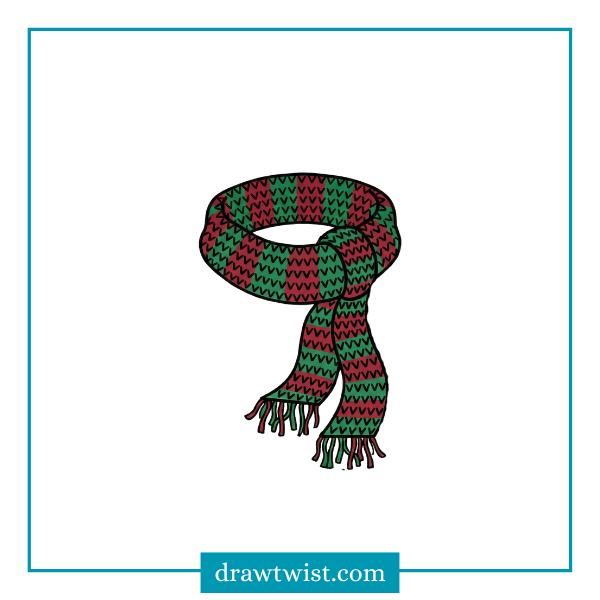
Pattern Idea 3: The Plaid (Checkered)
This looks like a cozy lumberjack shirt.
- How to do it: Draw stripes going up and down (vertical). Then, draw stripes going side to side (horizontal).
- Coloring Tip: Use three colors. Example: Red, Black, and Green.

Pattern Idea 4: Hearts and Stars
Perfect for a cute or magical scarf.
- How to do it: Alternate drawing a small heart, then a small star, then a heart again.
- Pro Tip: Keep the shapes simple. A star can just be an asterisk
*shape if drawing a 5-point star is too hard.

Pattern Idea 5: The “Knitted” Look
Want your scarf to look like grandma knitted it with wool?
- How to do it: Instead of drawing straight lines for stripes, draw wavy lines or little “v” shapes in rows. This mimics the texture of yarn.
Shading for Beginners
Want to make your scarf look 3D instead of flat? Try shading.
- Identify where the scarf folds or overlaps (like under the knot).
- Take a slightly darker color (like dark blue if your scarf is light blue).
- Color gently right under the knot and along the edges.
- This creates a “shadow” and makes the scarf pop off the page.
Creative Ideas – “Who is wearing the scarf?”
A scarf floating in the air is cool, but a scarf on a character is even better. Here are three easy things you can draw wearing your new scarf.
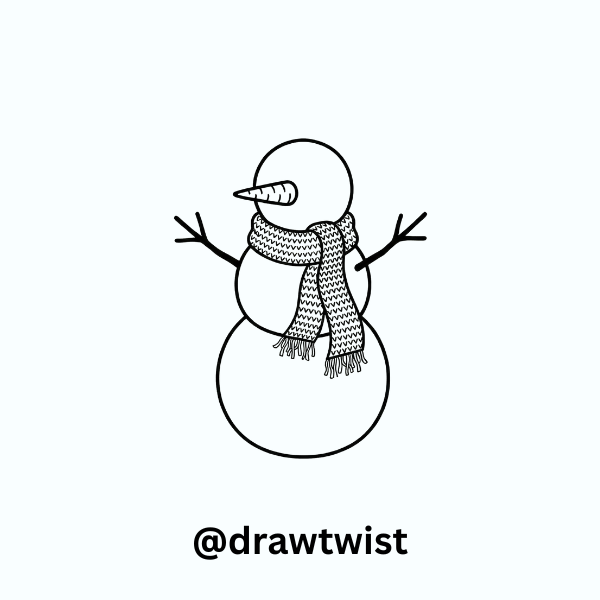
1. The Classic Snowman
- Step 1: Draw three circles stacked on top of each other (Small, Medium, Big).
- Step 2: Draw your scarf around the neck of the snowmen (between the top and middle circle).
- Step 3: Add a carrot nose and stick arms. The scarf makes him look finished.
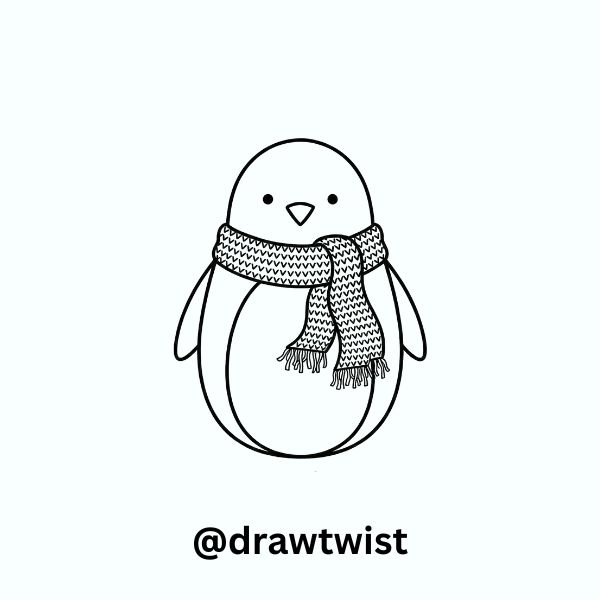
2. A Cute Penguin
- Step 1: Draw a large oval like a potato.
- Step 2: Add a smaller white oval inside for the tummy.
- Step 3: Draw the scarf wrapped around the top part of the oval.
- Step 4: Add a beak and flippers. A penguin in a scarf is the cutest thing ever.
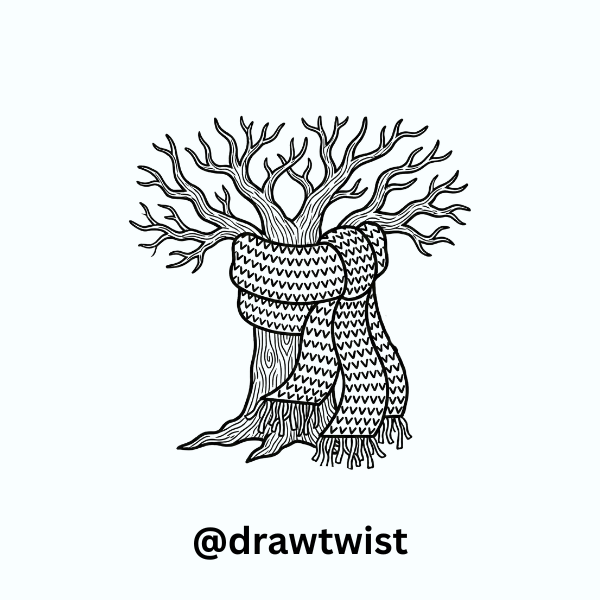
3. A Winter Tree
Wait, trees don’t wear scarves. Or do they? In a magical drawing, anything is possible.
- Step 1: Draw a bare winter tree with branches.
- Step 2: Draw a giant scarf wrapped around the trunk of the tree.
- Step 3: Maybe draw a little bird sitting on the scarf.
Fixing Mistakes
Sometimes drawings don’t turn out exactly how we want. That is okay. Here is how to fix common scarf problems.
Problem: “My scarf looks too stiff, like a ruler.”
Solution: Erase the straight lines and re-draw them with a wiggle. Fabric is soft, so lines should be curvy.
Problem: “The pattern looks messy.”
Solution: Slow down. Try drawing the pattern lightly with a pencil first. If you like it, trace over it with a marker.
Problem: “I colored outside the lines.”
Solution: Turn that mistake into a feature. Make the outside line thicker with a black marker to cover the messy coloring, or add “sparkles” (little dots) around the outside to hide it.
Congratulations! You have just become a Scarf Drawing Master.
You learned:
- How to warm up your artist hands.
- How to draw the basic scarf shape.
- How to add cool fringes and knots.
- How to design patterns like stripes and polka dots.
- How to use warm and cool colors.
One Last Challenge for You: Now that you know how to draw one scarf, can you draw a rainbow scarf that is so long it wraps around the whole page? Give it a try.
Keep practicing, keep drawing, and stay warm. Happy creating.
Read More: Winter Accessories Doodle, Snowflake Doodle Ideas, New Year Party Doodle