How to Draw Snowflake Doodle Drawing
There is something magical about snowflakes. We’ve all heard that no two are alike, and that is exactly what makes drawing them so much fun you can never make a mistake! Whether you are looking to decorate a holiday card, spice up your journal, or just relax on a cozy afternoon, doodling snowflakes is the perfect activity.
You don’t need to be an expert artist or have fancy tools. If you can draw a line and an “X,” you can draw a beautiful snowflake. In this guide, we will walk you through simple, step-by-step how to draw snowflake doodle methods to create everything from cute, bubbly flakes to elegant, icy crystals. Grab your pen and paper, and let’s let it snow.
Essential Tools and Materials
One of the best things about doodling is that the barrier to entry is low. You don’t need expensive equipment. However, having the right tools can make the process easier and the results crisper.
1. The Surface
- Grid or Dot Grid Paper: This is the secret weapon for snowflake artists. Because snowflakes rely on symmetry, having a grid helps you space the six arms evenly without needing a protractor.
- Smooth Cardstock: If you are making Christmas cards, use smooth white cardstock. The ink sits on top nicely and doesn’t bleed.
- Black Paper: For a striking “night sky” effect, use black paper with white gel pens.
2. The Pencils
- Mechanical Pencil: For drawing the initial “skeleton” or guidelines. A mechanical pencil stays sharp, ensuring your center point doesn’t get muddy.
- Eraser: A high-quality kneaded eraser or a white polymer eraser is essential for removing guidelines without smudging the final ink.
3. The Ink
- Fine Liners (Microns, Staedtler, etc.): These are the gold standard. Sizes 01 and 03 are great for intricate details, while 05 or 08 are good for thick outer outlines.
- White Gel Pens (Gelly Roll, Signo): Essential if you are drawing on kraft paper or black cardstock.
- Brush Pens: These can add variable line weight, making the snowflake look dynamic and icy.
4. Optional Geometry Tools
- Ruler: For perfectly straight arms.
- Compass & Protractor: If you want to get technical, you can use these to ensure your six arms are exactly 60 degrees apart, but for “doodling,” estimating is usually fine.
The Foundation – How to Draw a Skeleton
Every snowflake doodle starts with the same skeleton. Mastering this step is 80% of the work. If your skeleton is crooked, the snowflake will be crooked.
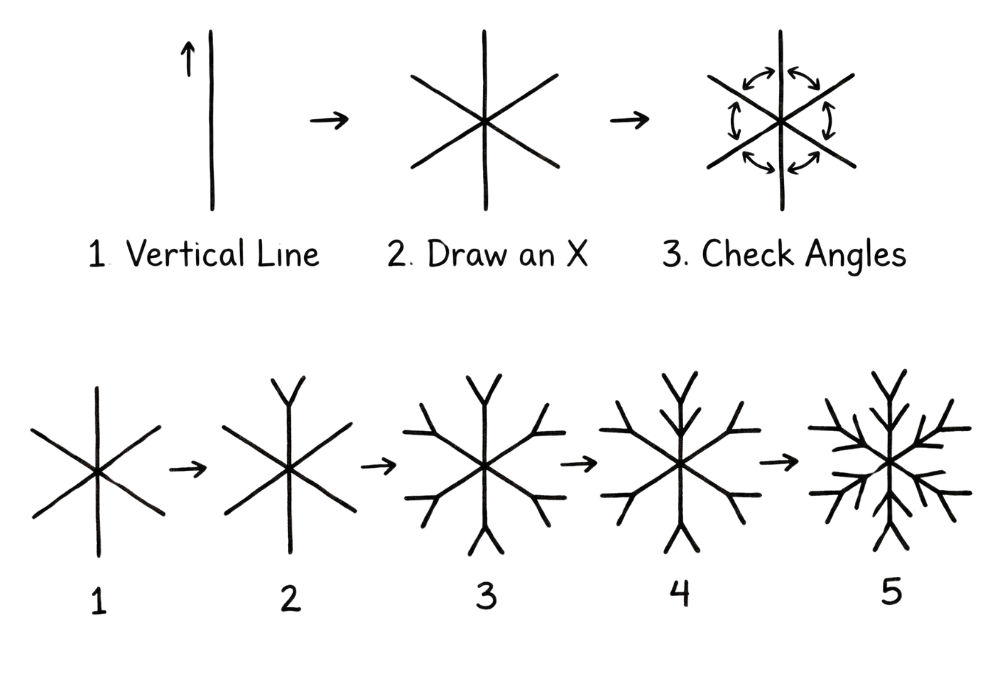
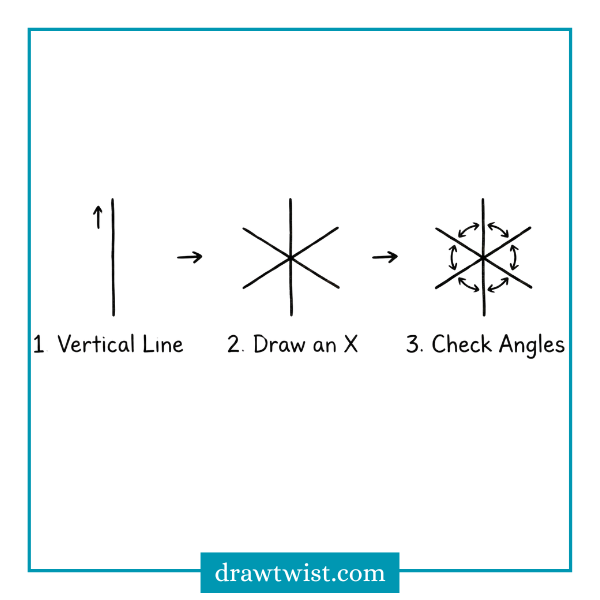
The “I-X” Method (The Easy Way)
This is the most common way to draw a 6-sided asterisk.
- Draw a Vertical Line: Draw one straight line down the middle ($|$).
- Draw an X: Draw an “X” over the vertical line. Try to make the “V” shapes at the top and bottom slightly wider than a standard handwritten X.
- Check the Angles: You should now have six arms meeting at a center point. Visually check if the spaces between the arms are roughly equal (like slices of a pizza).
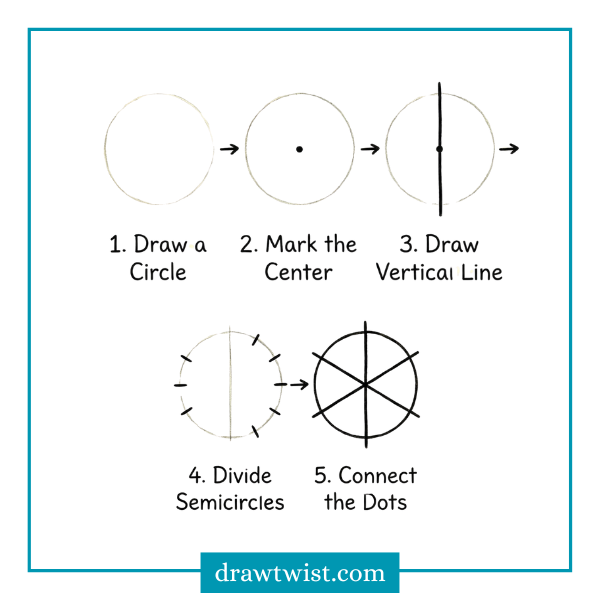
The “Circle” Method (The Precise Way)
If you have a compass or something round to trace:
- Draw a Circle: Lightly sketch a circle.
- Mark the Center: Place a dot in the dead center.
- Draw the Vertical Line: Draw a line through the center from top to bottom.
- Divide the Semicircles: Visualize the right half of the circle. Divide that arc into three equal parts. Do the same for the left side.
- Connect the Dots: Draw lines from these marks through the center. This ensures your arms are perfectly even lengths.
Pro Tip: Always draw this skeleton lightly in pencil. You will likely erase it later, or ink over it.
Step-by-Step Tutorials: How to Draw Snowflake
Now that we have our skeleton, we can dress it up. Here are 8 distinct styles of snowflake doodles, ranging from basic to advanced.
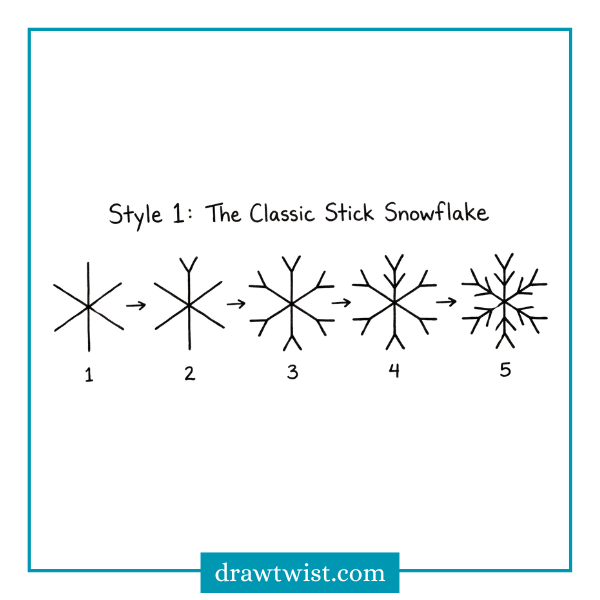
Style 1: The Classic “Stick” Snowflake
This is the quintessential doodle, perfect for small bullet journal headers.
- Base: Draw your 6-arm skeleton in ink.
- The V-Shapes: Go to the end of the top arm. Draw a small “V” pointing outward (like an arrowhead).
- Repeat: Do this for all 6 arms.
- The Inner V: Move halfway down the arm toward the center. Draw another “V” shape on the arm, but this time invert it so it opens outward.
- Finish: Repeat on all arms. You now have a simple, branched snowflake.
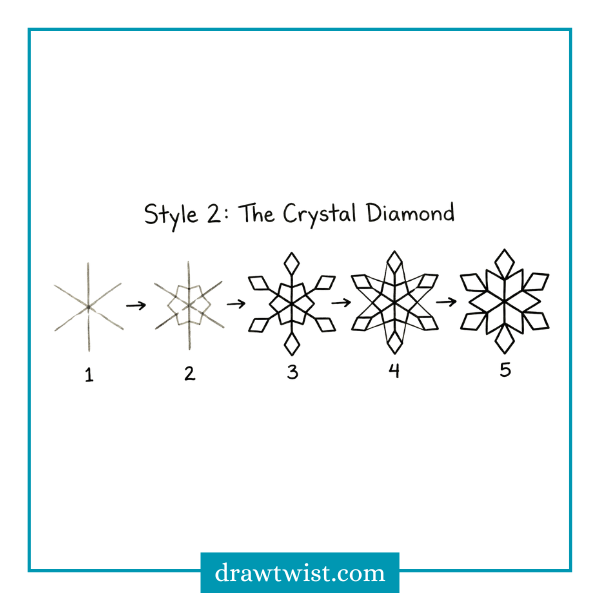
Style 2: The Crystal Diamond
This style uses geometric shapes to create a thicker, icier look.
- Base: Draw the 6-arm skeleton lightly in pencil.
- The Center Hexagon: Connect the arms near the center with straight lines to form a small hexagon.
- The Diamonds: At the tip of each arm, draw a diamond shape (rhombus). The tip of the arm should be the top point of the diamond.
- Connect: Draw a straight line connecting the widest part of the diamond back to the corners of the center hexagon.
- Ink: Trace the outer perimeter. You can leave the internal skeleton lines or erase them for a clean “crystal” outline.
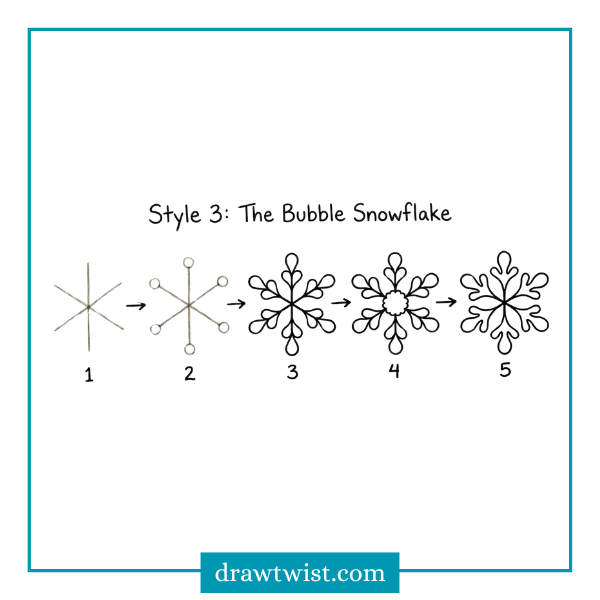
Style 3: The Bubble Snowflake
A cute, soft style that looks great on playful holiday cards.
- Base: Draw the 6-arm skeleton in pencil.
- The Tips: Instead of sharp points, draw a small circle at the end of each arm.
- The Bubbles: Along each arm, draw pairs of rounded bumps or teardrop shapes bulging outward.
- The Center: Draw a fluffy circle or a heart in the center.
- Ink: When inking, don’t use sharp corners. Keep all lines curved and fluid.
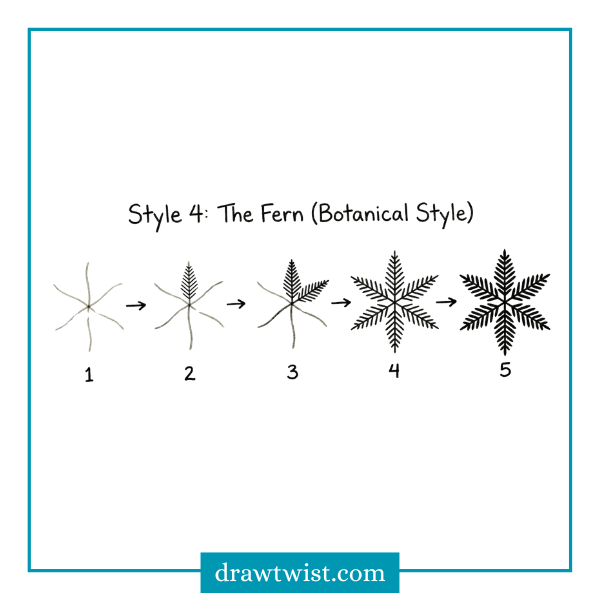
Style 4: The Fern (Botanical Style)
This looks like frozen leaves or pine needles.
- Base: Draw the 6-arm skeleton. Make the lines slightly curved or wavy for a natural look.
- The Fronds: Starting from the center and moving out, draw tiny lines coming off the main arm at a 45-degree angle.
- Density: Pack these lines close together. They should get shorter as you reach the tip of the arm.
- Taper: The result should look like 6 fern fronds meeting in the middle.
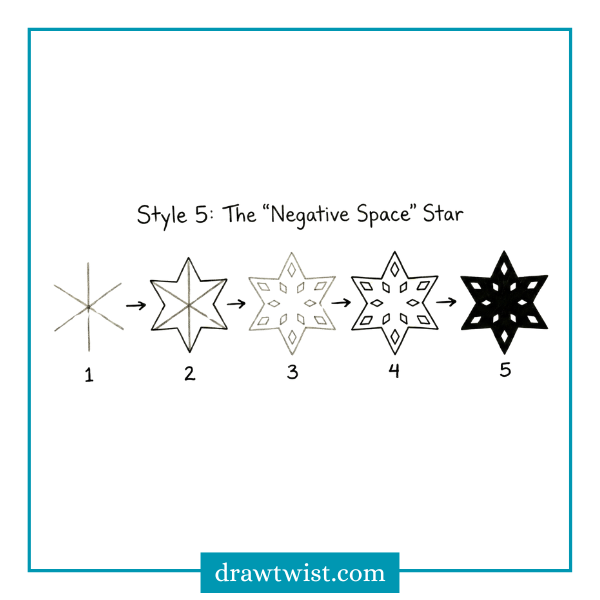
Style 5: The “Negative Space” Star
This requires a bit of planning but looks very sophisticated.
- Base: Draw the 6-arm skeleton in pencil.
- The Star: Draw a standard 6-pointed star around the skeleton (connect the tips of the arms to the midpoints between the arms).
- Internal Shapes: Inside each point of the star, draw a small circle or a smaller diamond that “floats” there.
- Ink: Ink the outline of the star and the outlines of the floating shapes.
- Fill: Color in the star, except for the floating shapes. This creates a cutout effect.
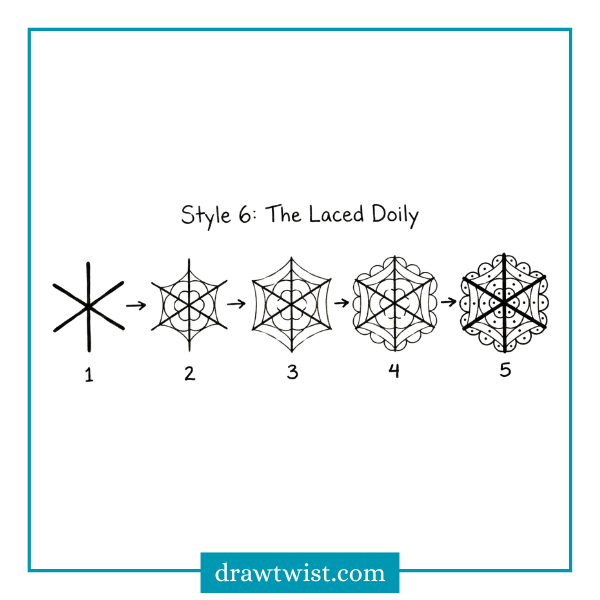
Style 6: The Laced Doily
Intricate and detailed, resembling lace.
- Base: Draw the 6-arm skeleton.
- Webbing: Connect the arms with curved lines, like a spider web. Do one row of webbing near the center, and another row further out.
- Scallops: On the outer row of webbing, draw scalloped edges (half-circles) between the arms.
- Details: Place a tiny dot in the center of every loop or scallop.
- Line Weight: Use a thinner pen for the internal details and a thicker pen for the main skeleton lines.
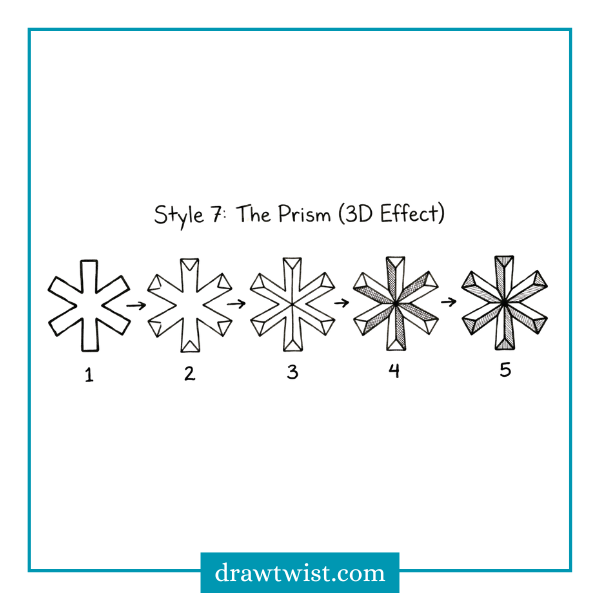
Style 7: The Prism (3D Effect)
Giving the snowflake depth.
- Base: Draw a thick 6-arm cross (draw the arms as rectangles rather than single lines).
- Points: Put a triangle on the end of each rectangle.
- The Ridge: Draw a straight line down the center of each arm.
- Shading: Choose a light source (e.g., top right). Shade one side of the ridge line on every arm (e.g., shade the left side of every arm). This makes the arms look like raised triangular prisms.
Style 8: The “Stacked” Snowflake
Combining different sizes.
- Base: Draw a large 6-arm skeleton.
- Rotation: Draw a smaller 6-arm skeleton centered on the same point, but rotate it 30 degrees so its arms fall exactly between the arms of the large one.
- Decorate: Decorate the large arms with “Style 1” (V-shapes) and the small arms with “Style 3” (Circles/Dots).
- Result: This creates a dense, 12-point burst that looks very full and festive.

Advanced Techniques and Ornamentation
Once you have mastered the basic shapes, you can start mixing and matching to create complex designs. Here is how to elevate your doodles.
1. Layering
Think of a snowflake as concentric rings.
- Ring 1 (Center): Start with a shape in the middle (star, hexagon, circle).
- Ring 2 (Mid-ground): Add details that bridge the gap (webbing, small diamonds).
- Ring 3 (Tips): Finish the ends of the arms (arrows, circles, points).By building in rings, you ensure the snowflake remains balanced.
2. Line Weight Variance
This is a professional illustrator’s secret. Don’t use the same pen for the whole drawing.
- Use a 0.8mm pen for the outer silhouette.
- Use a 0.3mm pen for internal geometric lines.
- Use a 0.05mm pen for shading or tiny hatching details.This creates contrast and makes the doodle “pop” off the page.
3. Adding Sparkle
Snowflakes glisten. To mimic this in a static drawing:
- External Sparkles: Draw tiny 4-pointed stars or dots floating around the snowflake.
- Highlights: If you are coloring the snowflake blue or grey, use a white gel pen to add a highlight line on one side of each arm.
Coloring Your Snowflakes
While black and white doodles are elegant, color brings the winter theme to life.
Color Palettes
- Frozen Blue: Cyan, Pale Blue, Navy, White.
- Vintage Christmas: Deep Red, Forest Green, Gold, Cream.
- Midnight: Purple, Indigo, Silver.
- Pastel: Mint Green, Baby Pink, Lavender (for a “candyland” winter).
Coloring Mediums
- Watercolor: Paint a loose blob of blue and purple watercolor on the paper. Let it dry completely. Then, use a black fine liner to draw the snowflake over the color. This is very trendy and easy.
- Colored Pencils: Draw the snowflake in white ink on dark paper, then use a white colored pencil to gently shade around the ink, creating a “glowing” effect.
- Glitter Pens: Trace your black lines with a silver glitter pen for instant festivity.
Practical Applications
You have practiced drawing them now what do you do with them?
1. Bullet Journals and Planners
- Mood Trackers: Draw a giant snowflake. Divide it into 31 sections (one for each day of December). Color a section based on your mood.
- Page Borders: Draw half-snowflakes peeking out from the corners of the page.
- Dividers: Draw a horizontal line of tiny connected snowflakes to separate days or tasks.
2. Handmade Greeting Cards
A hand-drawn snowflake card is personal and cheap.
- The Big Solo: Draw one massive, intricate snowflake in the center of the card. Write “No two are alike…” underneath, and “…just like you” on the inside.
- The Blizzard: Draw dozens of tiny snowflakes in different styles covering the whole front of the card.
3. Gift Tags and Wrapping
- Kraft Paper: Buy a roll of plain brown kraft paper. Use a white paint pen to doodle snowflakes all over it. It makes for chic, rustic wrapping paper.
- Tags: Cut cardstock into tag shapes, punch a hole, and draw a single snowflake monogram (the recipient’s initial in the center of the flake).
4. Window Art
- Use chalk markers (which wipe off glass easily) to draw snowflake doodles directly on your windows.5 It creates a beautiful view from both inside and outside.
Troubleshooting and Tips for Success
Even simple doodles can go wrong. Here is how to fix common issues.
“My snowflake looks like a spider.”
- The Problem: The arms are too long and thin, or curved weirdly.
- The Fix: Thicken the arms. Turn single lines into rectangles or diamonds. Add more “fluff” (V-shapes or dots) near the center to reduce the empty space.
“It’s not symmetrical.”
- The Problem: One arm is longer than the others.
- The Fix: Always start with the “Skeleton” method. Don’t freehand the arms. Also, rotate your paper as you draw. It is easier to draw a line towards your body than away or sideways. Turning the paper ensures you use the same hand motion for every arm.
“It looks messy.”
- The Problem: Smudged ink or too many pencil lines.
- The Fix: Be patient! Let the ink dry for at least 60 seconds before erasing the pencil guidelines. If using a ruler, wipe the edge of the ruler often to prevent ink drag.
Drawing snowflake doodles is a relaxing, meditative practice that yields beautiful results. It reminds us of the complexity of nature and the beauty of geometry. Whether you prefer the sharp edges of a crystal style or the soft curves of a bubble style, the only limit is your imagination.
So, grab your pen, find a cozy spot, and let it snow on your page. Remember, there are no mistakes just unique variations, exactly like the real thing.
Read More: Snowflake Doodle Ideas, How to Draw Penguin, How to Draw Chimney