How to Draw Fox in Snow: 7 Easy Step-by-Step Doodling Guide
Do you want to draw a cute, fluffy fox playing in the snow? You don’t need to be an expert artist. With just a few simple shapes like circles and triangles, you can create your very own winter fox.
This guide How to Draw Fox in Snow is perfect for a quick doodle or a fun project. Grab your pencil, and let’s get started.
What You Will Need
- A piece of white paper
- A pencil (for sketching)
- A black marker (for the outline)
- Crayons or colored pencils (Orange and Blue are best)
Warm-Up Doodles
Athletes stretch before they run, and artists should stretch before they draw! Let’s loosen up our hands.
- Draw Circles: Draw ten circles on a scrap piece of paper. Try to make them as round as a snowball. Big ones, small ones, tiny ones.
- Draw Triangles: Foxes are made of lots of triangles (ears, nose, face). Draw ten triangles. Try upside-down triangles too!
- Draw “M” Shapes: Write the letter “M” over and over again. This shape is used for fur and grass.
- Draw Clouds: Draw fluffy, bumpy cloud shapes. We will use these for the fox’s tail and the snow.
Feeling ready? Let’s draw our first fox.
Project 1: The Simple Fox in Snow
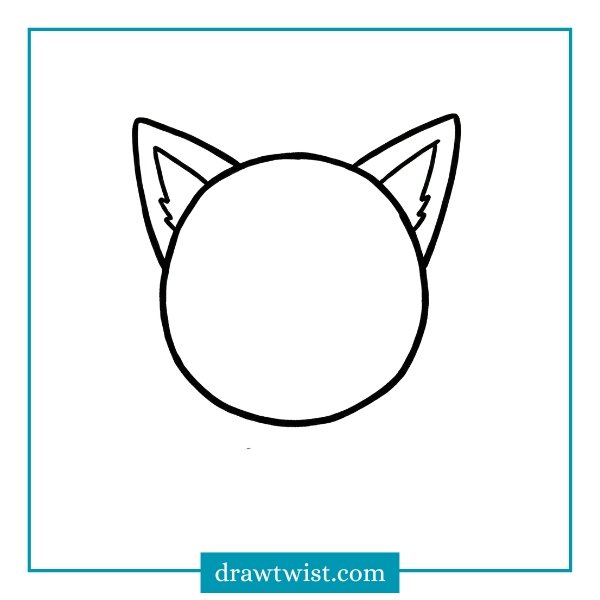
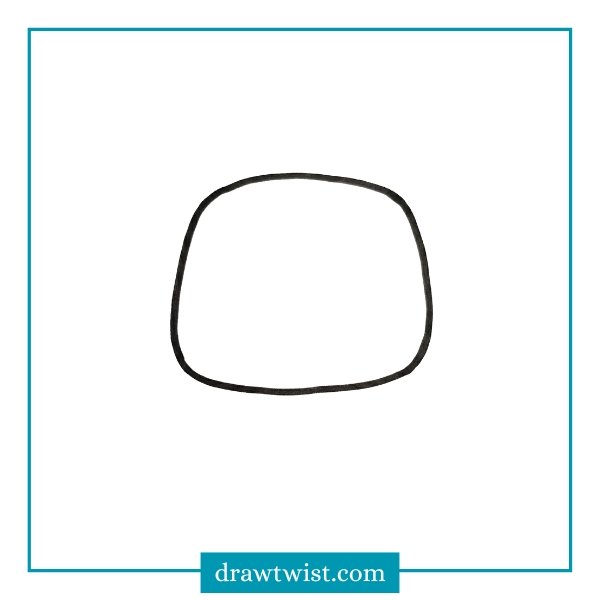
Step 1: Start with the Head
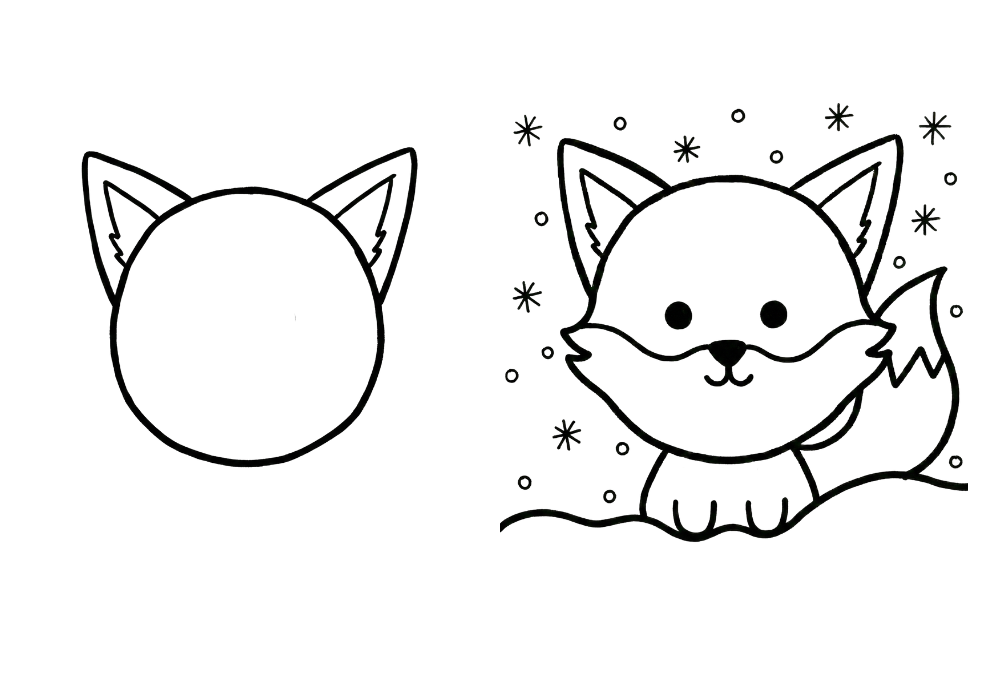
First, draw a slightly flattened circle in the middle of your page. This doesn’t have to be perfect! Think of it like a squashed orange. This will be your fox’s head.
Step 2: Add the Ears
Foxes have big, listening ears! Draw two triangles on top of the head.
- Make them pointy at the top.
- Draw a smaller triangle inside each one to show the fluffy inside of the ear.
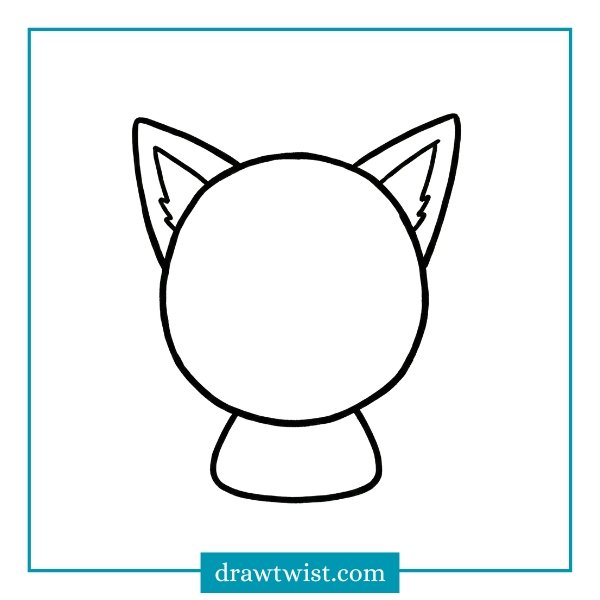
Step 3: Draw the Body
Now, let’s draw the body. Start from the bottom of the head and draw a shape that looks like a gumdrop or a rounded triangle. It should be smaller than the head because our fox is sitting down to stay warm.
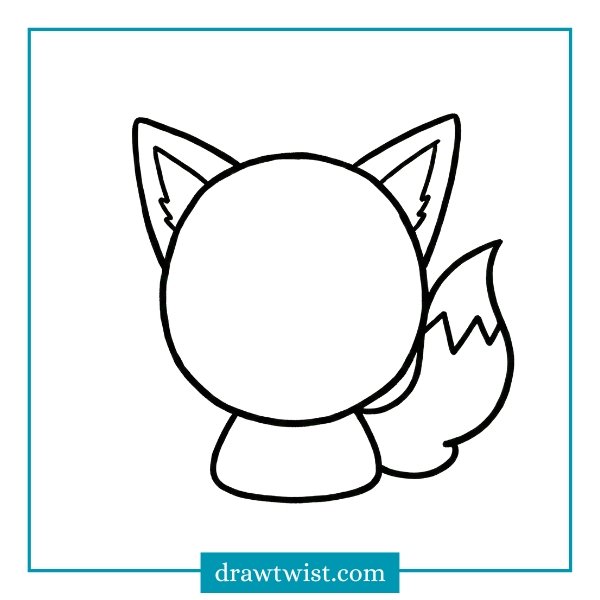
Step 4: The Big Bushy Tail
The best part of a fox is its tail.
- Start at the side of the body.
- Draw a big, curvy cloud shape that wraps around the fox’s side.
- Make sure it ends with a pointy tip!
- Draw a zigzag line near the tip of the tail to show the white part (the “tag”).
Step 5: The Cute Face
Let’s give the fox some personality.
- Eyes: Draw two black dots or small circles in the middle of the face.
- Nose: Draw a small upside-down triangle between the eyes, but a little lower. Color it black.
- Cheeks: Draw two curvy lines going out from the nose to the sides of the face to make the fox look furry.
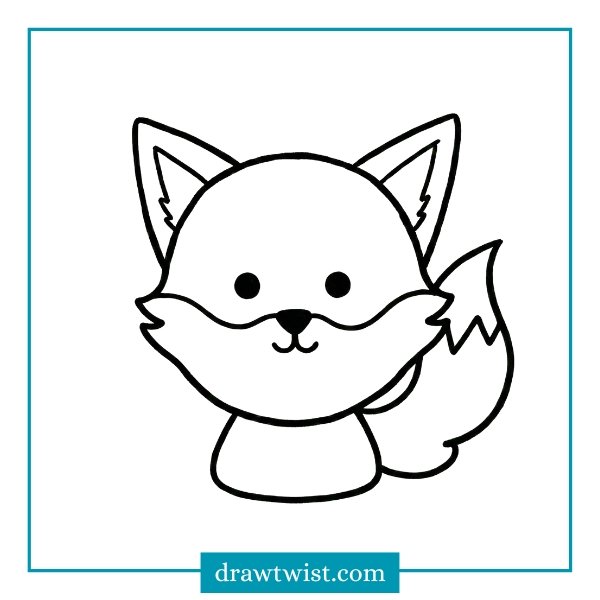
Step 6: Add the Legs
Since the fox is sitting in deep snow, we don’t need to draw complex paws!
- Draw two simple “U” shapes at the bottom of the body for the front legs.
- Draw a wavy line right across the bottom of the fox. This is the snow covering its toes!
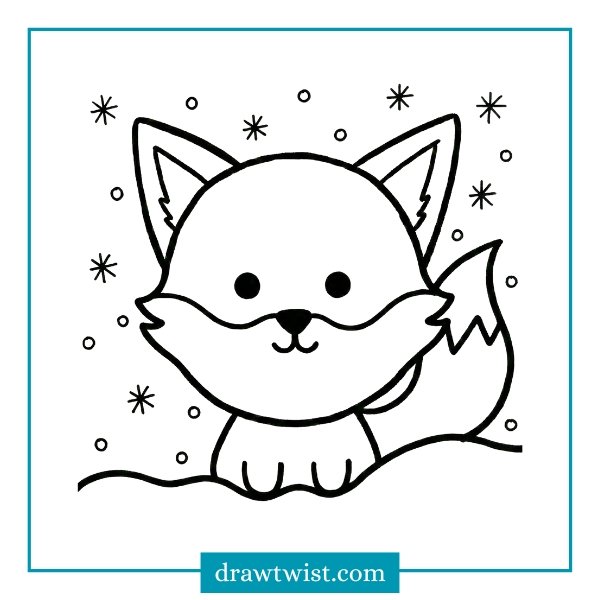
Step 7: Outline and Snowflakes
- Outline: Take your black marker and trace over your pencil lines. Make the lines thick and bold to give it a cool cartoon look.
- Snow: Draw small circles all around the fox for falling snow. You can also add a few simple snowflake shapes (like little stars).
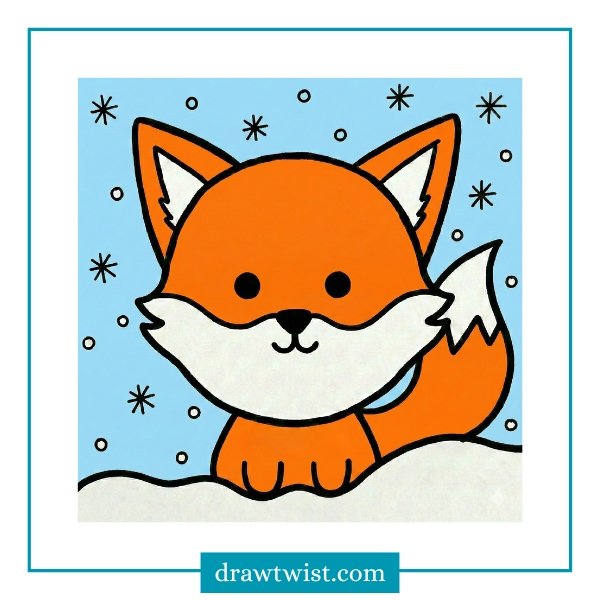
Coloring Time
Now it’s time to bring your fox to life.
- Fox: Color the fox bright orange. Leave the bottom of the face, the inside of the ears, and the tip of the tail white.
- Legs: Color the little “U” shaped paws black (foxes have black socks!).
- Snow: You can leave the snow white, or color the background light blue to make the white snow stand out.
Final Tip
Don’t worry if your lines are wiggly. Wiggly lines make the fox look even fluffier! Have fun and try drawing a whole family of foxes.
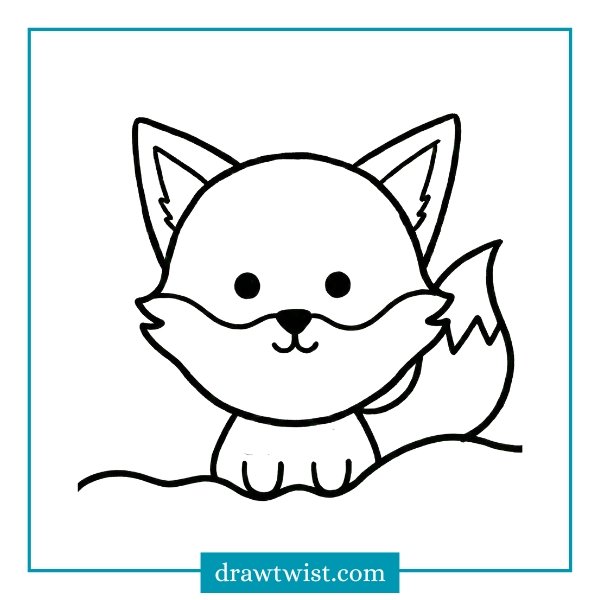
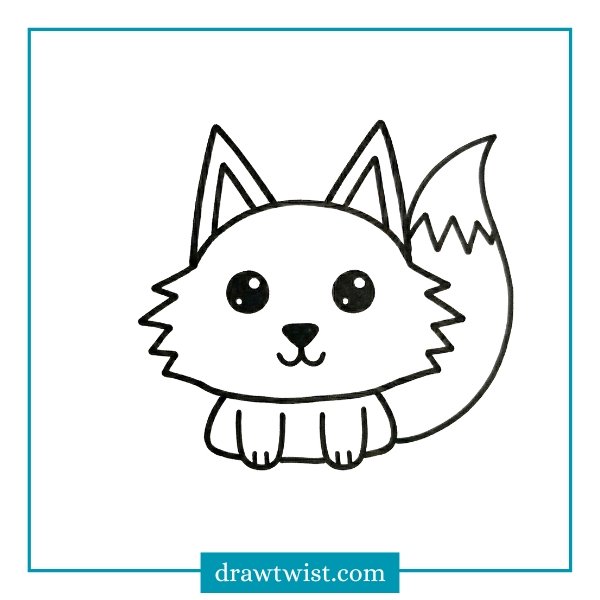
Project 2: The Sitting Winter Fox (Step-by-Step)
This is our main project. We are going to draw a polite fox sitting nicely in the snow, watching the snowflakes fall.
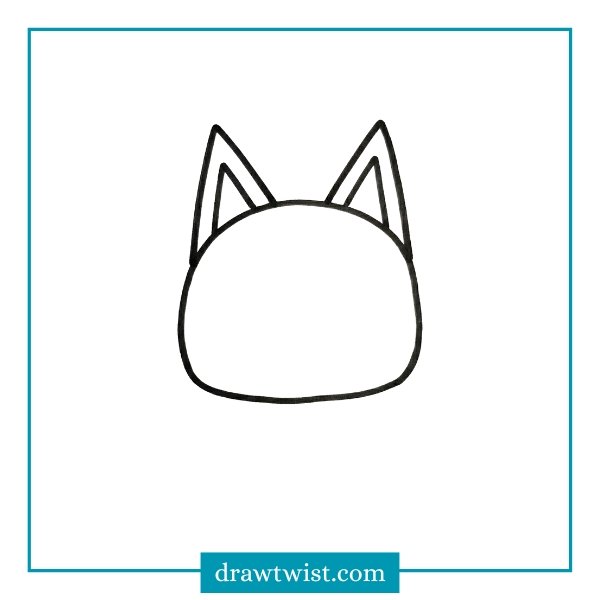
Step 1: The Head Shape
Start in the middle of your paper. Draw a shape that looks like a soft bun or a rounded rectangle. It shouldn’t be a perfect circle. It should be a little wider than it is tall. This makes the fox look chubby and cute.
Step 2: The Triangle Ears
Foxes have the best ears in the forest!
- On top of the head, draw two large triangles.
- Make them tall!
- Pro Tip: To make the ears look 3D, draw a smaller triangle inside the big ones. This is the fluffy inside part of the ear.
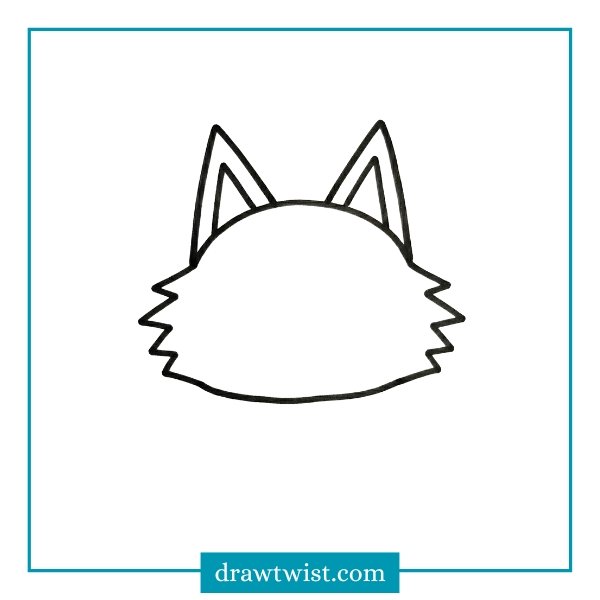
Step 3: The Fluffy Cheeks
Now, let’s make the face look furry.
- Start at the side of the head, right under the ear.
- Draw a zigzag line pointing outwards (like lightning bolts) going down towards the chin.
- Do this on both sides. Now your fox has a winter coat.
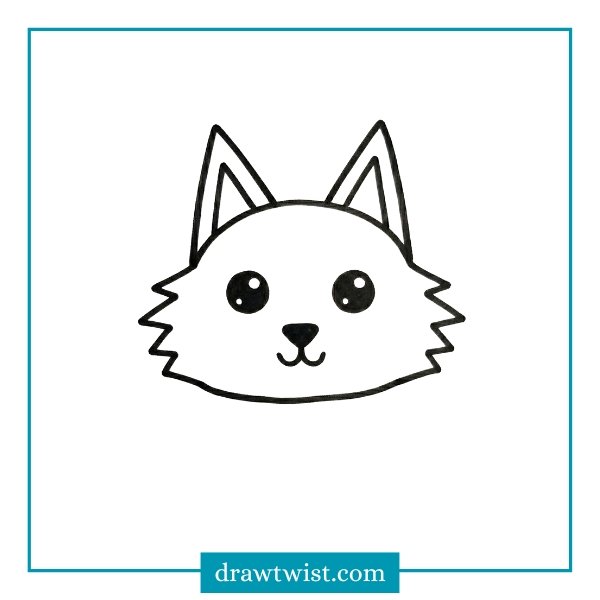
Step 4: The Face
Let’s give our friend some personality.
- The Nose: In the very bottom middle of the face, draw a small upside-down triangle (or a heart shape!). Color it black.
- The Snout: Draw a tiny “W” shape right under the nose. This is the mouth.
- The Eyes: Draw two big black circles above the nose. Leave a tiny white dot inside each circle to make the eyes sparkle. This is called a “catchlight.”
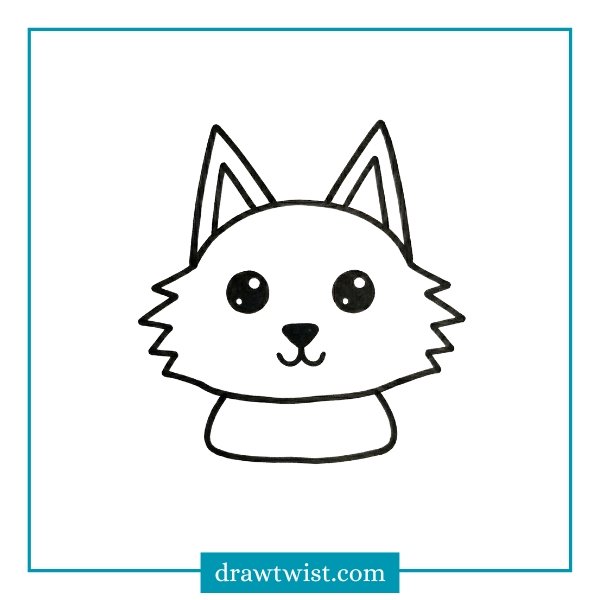
Step 5: The Body
Start from the bottom of the furry cheeks. Draw a simple gumdrop shape or a bell shape.
- The lines should curve out and then go flat at the bottom.
- Don’t make the body too long; short bodies look cuter.
Step 6: The Front Paws
Our fox is sitting straight.
- Inside the body shape, at the bottom, draw two long “U” shapes.
- These are the front legs.
- At the bottom of the “U,” draw two little lines for toes.

Step 7: The Super Fluffy Tail
This is the most important step!
- Start the line near the bottom of the fox’s body on the right or left side.
- Draw a huge, swooping curve that goes UP towards the head.
- Make it look like a giant flame or a big leaf.
- Bring the line back down to the body.
- The White Tip: Draw a zigzag line near the end of the tail. When we color later, the tip will stay white, and the rest will be orange.
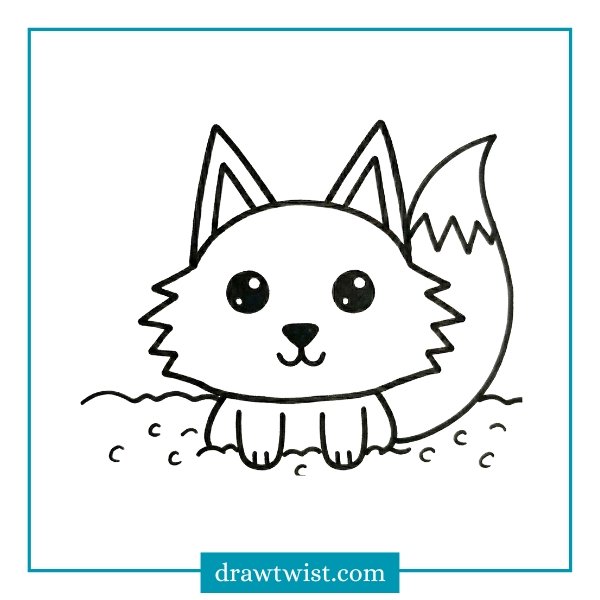
Step 8: The Snow Ground
Our fox can’t float in the air.
- Draw a wavy, bumpy line going horizontally behind the fox. This is the snowdrift.
- Draw a few little “C” shapes around the paws to show that the fox is sinking slightly into the soft snow.
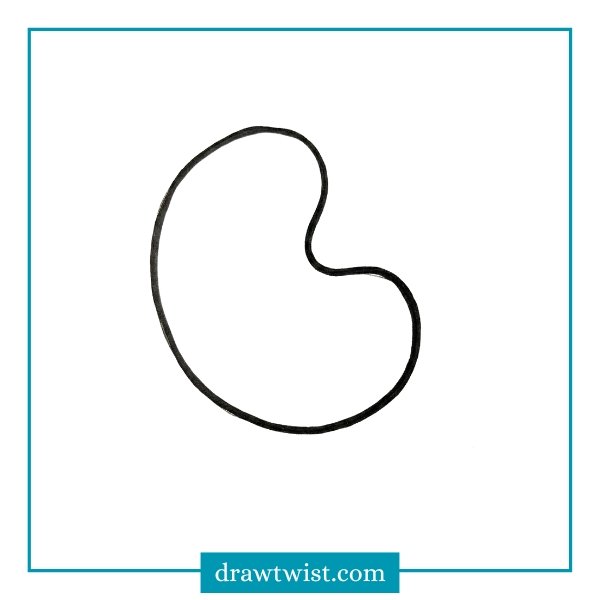
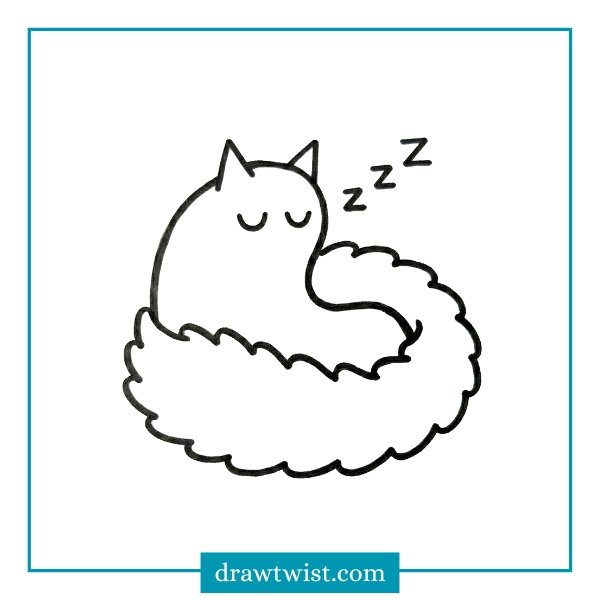
Project 3: The Sleeping Fox (The “Donut” Pose)
Foxes love to curl up in a ball to stay warm. We call this the “Donut Fox.” This one is even easier to draw!
Step 1: The Bean Shape
Draw a large kidney bean shape or a curled sausage shape. This is the fox’s body curled up.
Step 2: The Tail Blanket
Draw a big, fluffy tail wrapping all the way around the bottom of the bean shape. The tail should cover the fox’s nose! It acts like a built-in blanket.

Step 3: The Sleeping Face
Since the fox is tucked in, we only see the top of the head.
- Draw two closed eyes. You can do this by drawing two “U” shapes or two flat lines.
- Draw the triangle ears sticking up from the top of the bean shape.
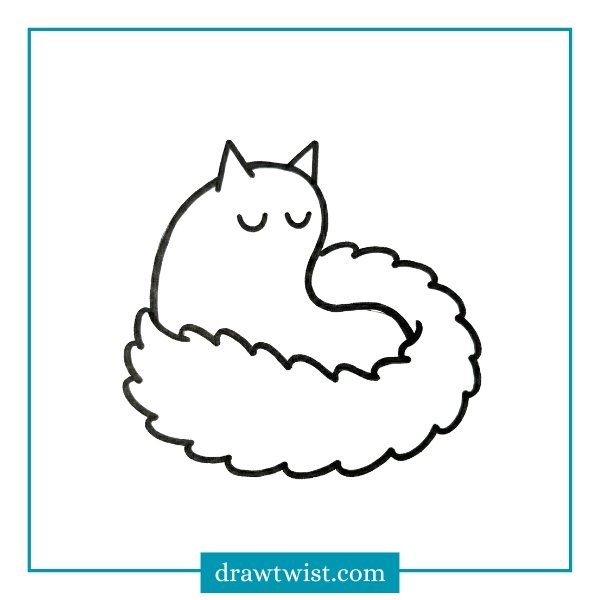
Step 4: Zzzzz
Draw a few “Z” letters floating above the fox to show it is fast asleep.
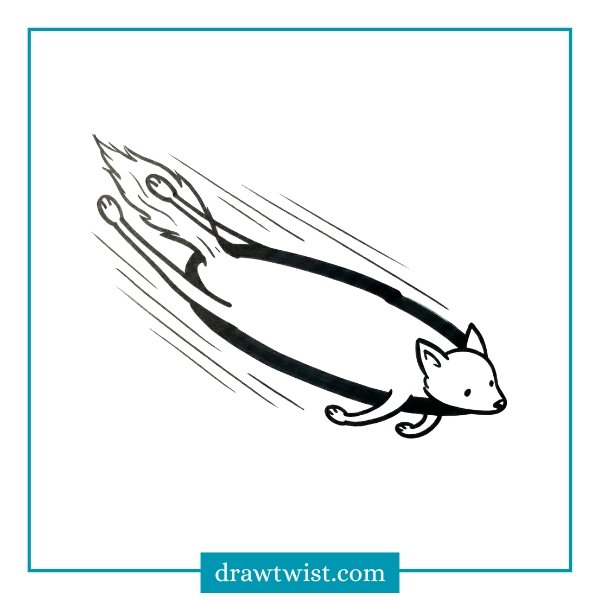
Project 4: The Jumping Pounce
Foxes hunt in the snow by jumping high and diving nose-first! Let’s draw an action pose.
Step 1: The Flying Body
Draw an oval that is tilted in the air (like it’s diving downwards).
Step 2: The Legs
- Draw the back legs stretching out behind the body (pointing up).
- Draw the front legs tucked in close to the chest.
Step 3: The Head and Tail
- Draw the head looking down at the ground.
- Draw the tail streaming out behind the fox, showing speed!
- Add “motion lines” (straight lines behind the fox) to show it is moving fast.
Coloring Guide for How to Draw Fox in Snow
Now that we have our drawing, let’s add color. But wait! There are some special tricks to make it look awesome.
The Fox’s Colors
- Orange: Color the main body, the head, and the outside of the ears bright orange.
- Black: Color the nose and the bottom of the legs (the “socks”).
- White: Leave these parts white (do not color them!):
- The tip of the tail.
- The chest/belly.
- The bottom half of the face (the muzzle).
- The inside of the ears.
The Snow’s Colors
Snow is white, but if we leave it white on white paper, it looks boring.
- The Shadow Trick: Take a Light Blue crayon. Color gently under the fox and under the trees. This makes the snow look cold and real.
The Sky
If you are feeling brave, color the whole sky a dark blue or purple. This will make the white snow and the orange fox pop out and look super bright.
Drawing is all about having fun and using your imagination. It doesn’t matter if your fox looks like a potato or a sausage. if you had fun drawing it, it is a masterpiece.
Remember the simple steps:
- Head (Circle)
- Ears (Triangles)
- Body (Gumdrop)
- Tail (Big fluffy cloud)
Keep practicing. Maybe tomorrow you can draw a fox wearing a scarf, or a fox drinking hot cocoa. The forest is yours to create. Happy Doodling.
Read More: How to Draw Snowflake Doodle, How to Draw Penguin, Winter Animal Doodles


![29 Halloween Doodles Anyone Can Draw [Cute & Spooky]](https://drawtwist.com/wp-content/uploads/Halloween-Doodles-768x518.png)