
How Do You Draw Christmas gift box
Drawing a cute gift box is one of the easiest and most fun doodles for kids and beginners. Whether you want to make a birthday card, Christmas art, or just practice simple shapes, this tutorial will help you create a beautiful gift box in just a few steps.
In this guide, you’ll learn how to draw a gift box using basic lines, simple shapes, and fun decorations. By the end, you’ll have a cute, colorful gift box that you can customize any way you like.
What You Will Need
- A blank sheet of paper
- Pencil
- Eraser
- Black pen or marker (for outlining)
- Colors (crayons, color pencils, or markers)
How to Draw Christmas gift box (Step-by-Step Instructions)
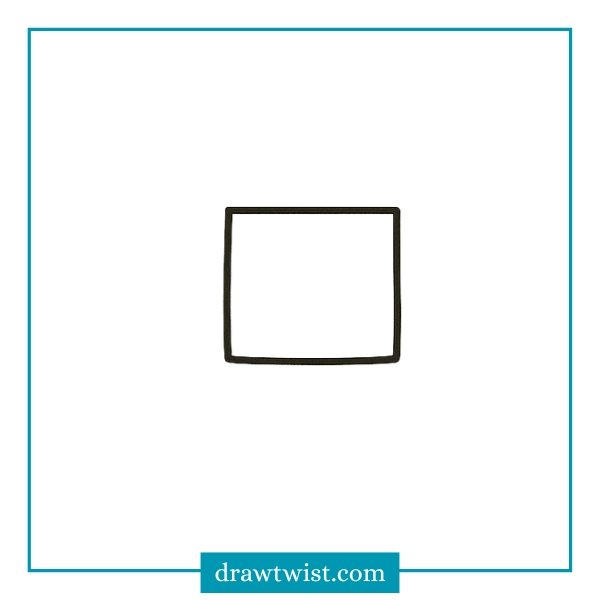
Step 1: Draw the Square Base
To begin your gift box, start by drawing a simple, perfect square in the center of your paper. This shape will serve as the main body or the “container” part of the box. Try to keep all four lines (top, bottom, left, and right) the same length.
Ensure your lines are straight and the corners meet at sharp angles to give the box a solid, structured look. You can use a ruler if you want it to be precise, or freehand it for a sketchier style.

Step 2: Draw the Vertical Ribbon
Inside the square you drew in Step 1, draw two straight vertical lines from the top edge all the way to the bottom edge. Try to place these lines right in the middle of the square. Leave a small, even space between the two lines. This strip represents the ribbon wrapping vertically around the gift.

Step 3: Draw the Lid Line
Now, you will define the lid of the box. Draw a straight horizontal line across the upper part of the box. Place this line roughly a quarter of the way down from the top edge. This creates a rectangular section at the top, which represents the lid sitting on the base.
Draw the line on the left and right sides of the vertical ribbon, connecting the outer edge of the box to the vertical lines in the center.

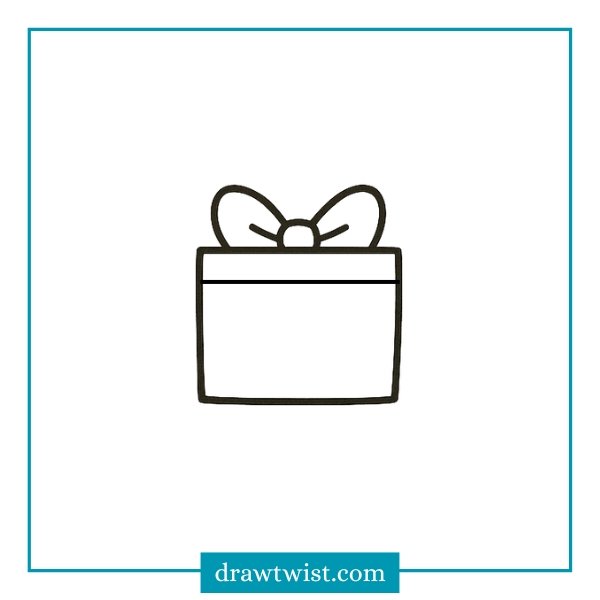
Step 4: Add the Bow
Now it’s time to add the decorative top and refine the box shape. Extend the sides of the top rectangular section slightly outward past the walls of the box base. This slight overhang makes the lid look like it is sitting on top of the box.
At the very center of the lid’s top edge, draw a small semi-circle or rounded shape. This acts as the knot where the ribbon is tied. Draw two large, petal-shaped loops extending from the center knot one to the left and one to the right. Add a small curved line inside each loop to show the fold of the ribbon, giving it a 3D effect.

Step 5: Color Your Gift Box
Finally, bring your drawing to life by adding color!
- Color the Ribbon and Bow: Use a vibrant color (like the orange shown in the image) to fill in the vertical ribbon strip, the center knot, and the two bow loops. This makes the wrapping stand out.
- Color the Box: Use a contrasting color (like yellow or gold) for the remaining parts of the box base and the lid.
- Customize: Feel free to use any color combination you like, or even add patterns like polka dots or stripes to the wrapping paper to make it unique.

Tutorial 2: Cute Christmas Gift Box Drawing
Step 1: Draw the Box Outline
To start your cute gift box, draw a simple square shape in the middle of your page. Draw four connected lines to create a box. It acts as the container for the present. Notice how the lines in the image are thick and a little soft? You don’t need a ruler! Drawing the lines slightly freehand gives it a charming, hand-drawn, and cartoon-like style rather than a rigid geometric look.
Step 2: Draw the Big Bow
Now, add a large, fluffy bow right on top of the box. Start by drawing a small, rounded shape (like a semicircle or a gumdrop) sitting exactly in the middle of the top line of your box. This is the center knot of the bow.
Draw two large, rounded loops extending out from the center knot one to the left and one to the right. They should look a bit like big bunny ears or flower petals. Inside each loop, draw a small curved line near the knot. This small detail makes the bow look puffy.

Step 3: Draw the Lid Line
Next, you will create the lid of the box. Draw a straight line across the box, from the left side to the right side. Place this line near the top, just below the bow. This line divides the box into two parts: a smaller top section for the lid and a larger bottom section for the container.
Step 4: Add the Cute Face
This is the step that makes the gift box “cute”! You will add a face to the front of the box.
- Draw the Eyes: In the middle of the lower section of the box, draw two small, filled-in black circles. Space them out slightly.
- Draw the Mouth: Right between the eyes, but slightly lower, draw a tiny “u” shape or a small curve.
- Placement: Keep the face centered horizontally on the box to give it that charming “kawaii” character look.

Step 5: Add Ribbon Details and Blush
Now, give your gift box its finishing touches to make it extra adorable. Draw two short vertical lines in the center of the lid (the rectangular part just below the bow). This connects the bow to the box. Add a tiny white dot inside each black eye. This “highlight” makes the character look alive and shiny.
(If you are using a pencil, you can just erase a small spot). Draw two soft pink ovals underneath the eyes to give the box a blushing, happy expression.

Step 6: Color Your Cute Gift Box
The final step is to bring your character to life with color. Fill in the main square and the lid with a bright, cheerful color. The image uses a sunny yellow, which looks great for a happy gift.
Use a contrasting color for the bow and the ribbon strip. The orange used here makes the bow stand out against the yellow box. Make sure the pink spots on the cheeks are visible to emphasize the blushing, cute expression. You can use your favorite colors. Try a blue box with a silver ribbon, or a pink box with a purple ribbon.

Tutorial 3: Cute Kawaii Gift Box Drawing
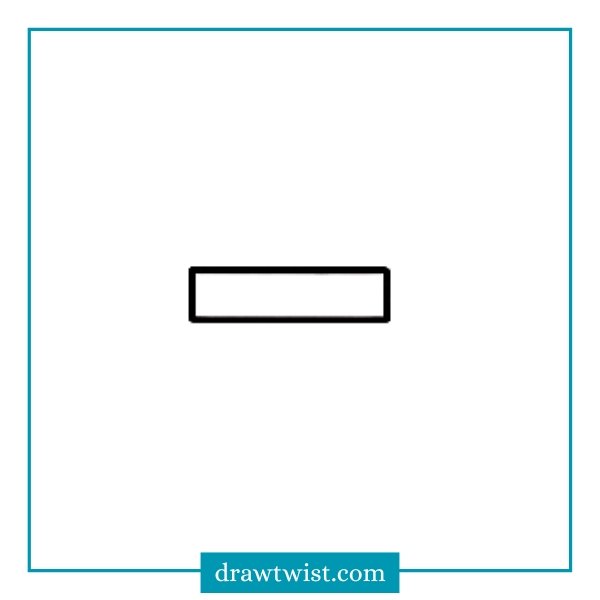
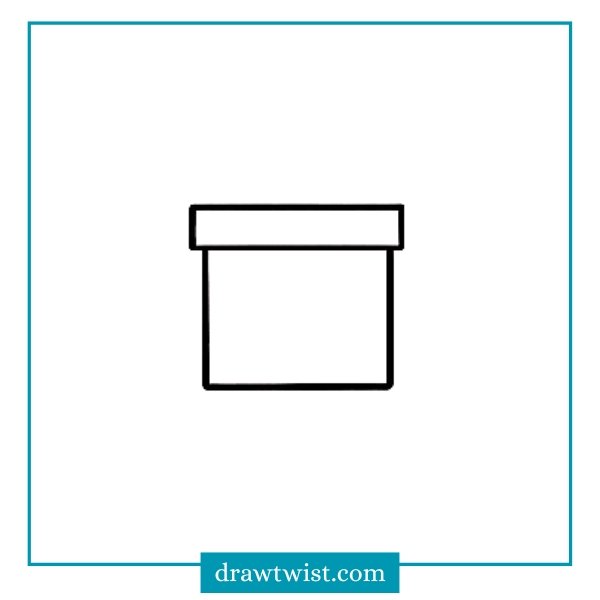
Step 1: Draw the Lid Rectangle
Start by drawing the top part first. Draw a long, narrow rectangle in the center of your paper. Make it much wider than it is tall, like a thin bar. This will act as the rim of the lid that sits on top of the box. Keep your lines fairly smooth.
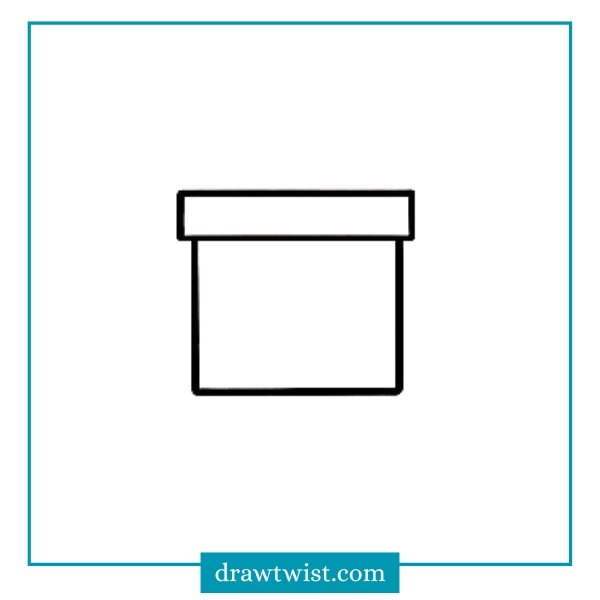
Step 2: Draw the Box Base
Now, draw the main container of the gift box underneath the lid you just made. Draw two vertical lines extending downward from the bottom edge of the lid rectangle. Start these lines slightly inward from the corners of the lid.
This makes the lid look like it is wider than the box, which is a classic gift box shape. Connect the bottom of these two vertical lines with a straight horizontal line to close the shape. You should now have a square box sitting under a rectangular lid.
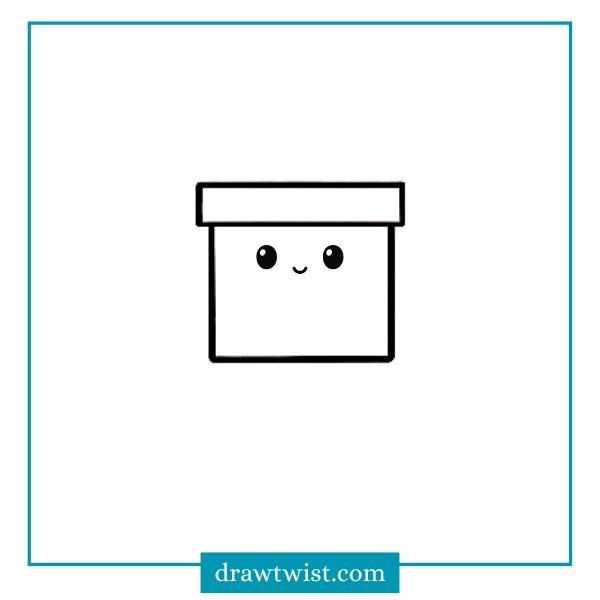
Step 3: Draw the Kawaii Face
Now, give your box some personality by adding a cute face to the front. In the upper part of the box base (just below the lid), draw two small circles. Fill them in with black, but leave a tiny white dot in each one. These white “glints” make the eyes look shiny and alive.
Between the eyes, draw a tiny, curved “u” shape. Keep it small and centered to maintain that sweet “kawaii” look. Notice that the face is positioned slightly high up on the box, which adds to the cute proportions.
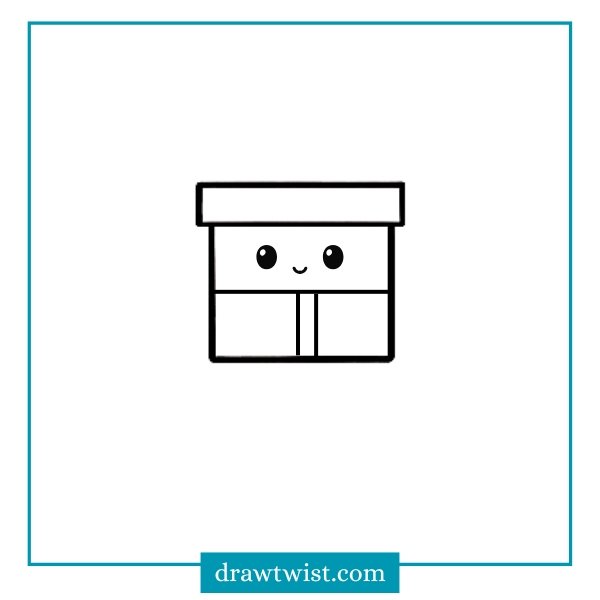
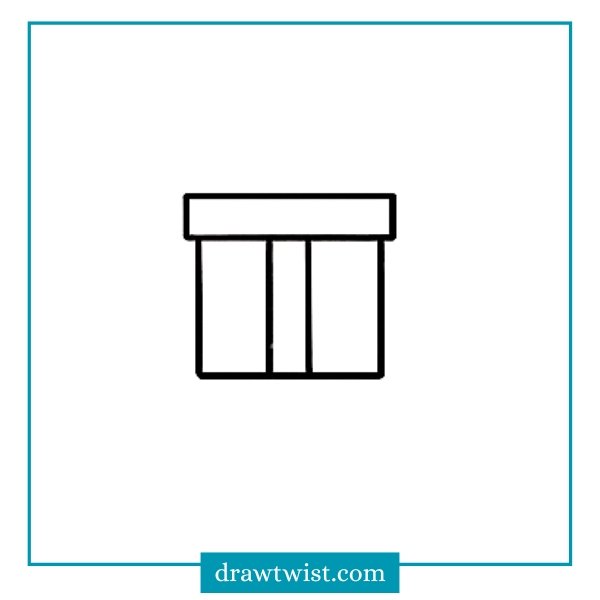
Step 4: Draw the Ribbon Lines
Now, let’s add the lines that will make up the ribbon wrapping around the box. Draw a straight horizontal line across the box, positioning it below the cute face. This separates the face area from the bottom section.
Starting from the horizontal line you just drew, draw two straight vertical lines going down to the bottom edge of the box. Place these two vertical lines right in the middle, leaving a small gap between them. This creates the vertical strip of the ribbon.
Step 5: Add the Big Bow
Now, top off your kawaii gift box with a fancy bow. Start by drawing a small circle in the center, sitting right on top of the lid. Draw two large, puffy loops extending from the knot one to the left and one to the right. Add a small curved line inside each loop to show the fold of the ribbon.
Draw a small, curved shape hanging down from the left side of the knot to look like a loose end of the ribbon. Draw two short vertical lines on the lid (the top rectangle) directly under the knot. This connects the bow to the ribbon on the main part of the box.

Step 6: Color Your Kawaii Gift Box
The final step is to make your drawing pop with color and shading. Fill in the lid and the main container with a nice, solid color. The example uses a fresh green.
Use a bright color like yellow or cream. You can leave the tops of the bow loops slightly lighter or white to make them look shiny and puffy. Use a soft pink color to draw small oval shapes on the cheeks, right under the eyes. This is essential for the “kawaii” style.

Tutorial 4: The Festive Candy Cane Surprise
Step 1: Draw the Box Outline
To begin, you need to draw the gift box that will hold the candy cane. Start by drawing a narrow, horizontal rectangle near the center of your page. This will be the lid of the box. Underneath the lid, draw a square shape. Make sure the sides of the square start slightly inward from the edges of the lid. This slight overhang makes it look like a real box lid resting on top.
Step 2: Draw the Vertical Ribbon
Now, let’s decorate the gift box by adding a ribbon down the front. Inside the bottom square section of the box, draw two straight vertical lines running from the bottom edge of the lid all the way down to the bottom of the box. Position these lines right in the middle of the box, leaving a small gap between them. This strip represents the ribbon wrapping around the gift.
Step 3: Draw the Horizontal Ribbon
Now, you will complete the ribbon wrapping by adding the horizontal strip. Draw a straight horizontal line across the middle of the box on the left side, and another one on the right side.
Start these lines from the outer edges of the box and stop them exactly where they touch the vertical ribbon lines you drew in the previous step. This creates a cross shape on the front of the box, making it look like the ribbon is wrapped all the way around.

Step 4: Add the Bow
Now, top off the gift box with a nice big bow. Start by drawing a small circle or oval in the center, sitting right on top of the box lid. Distinct loops extending from the knot one to the left and one to the right. Inside each loop, add a small curved line to show the fold of the ribbon.
Draw a small ribbon end hanging down from the left side of the knot to make it look realistic. Draw a short vertical line on the lid itself, directly under the knot, to connect the bow to the ribbon on the box.

Step 5: Draw the Candy Cane
Insert the sweet treat into the gift box. Emerging from behind the right side of the bow, draw a curved “shepherd’s crook” or hook shape. It should go up and curve over to the right. Draw a second curved line parallel to the first one to give the candy cane thickness.
Connect the two lines at the end with a smooth, rounded curve. Make sure the bottom lines of the candy cane stop right at the bow or the lid. This creates the illusion that the candy cane is tucked inside the box.

Step 6: Add Stripes to the Candy Cane
To finish the line drawing, you need to add the classic peppermint stripes to your candy cane. Draw a series of short, curved lines across the width of the candy cane. Make sure the lines curve slightly to match the shape of the cane.
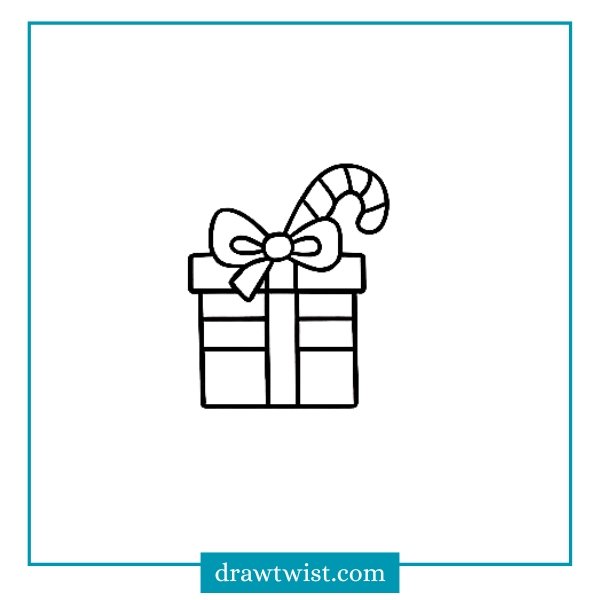
Step 7: Color Your Festive Gift Box
The final step is to bring your drawing to life with festive colors. Fill in the stripes on the candy cane with red, alternating with white spaces. This gives it the classic peppermint look.
Color the box lid and the main container with a deep red. This makes it look like a holiday present. Use a contrasting green for the bow and the ribbon strips. The red and green combination gives your drawing a perfect Christmas feel.

Tips for Drawing a Perfect Gift Box
- Use a ruler if you want perfectly straight lines.
- Try different box shapes: tall, wide, or tiny.
- Decorate each box with different patterns.
- Add a cute face to make it Kawaii.
- Draw multiple boxes stacked together for a holiday theme.
Learning how to draw a gift box is a fun and simple activity that anyone can do. With just a few steps square, lid, ribbons, bow you can create an adorable gift box drawing for any occasion.
Whether you’re making Christmas cards, birthday wallpapers, or doodle practice, this tutorial is perfect for beginners and kids of all ages.
Read More: Elf Christmas Doodle Ideas, Christmas Lights Doodle, How to Draw Christmas Tree
![29 Halloween Doodles Anyone Can Draw [Cute & Spooky]](https://drawtwist.com/wp-content/uploads/Halloween-Doodles-768x518.png)