
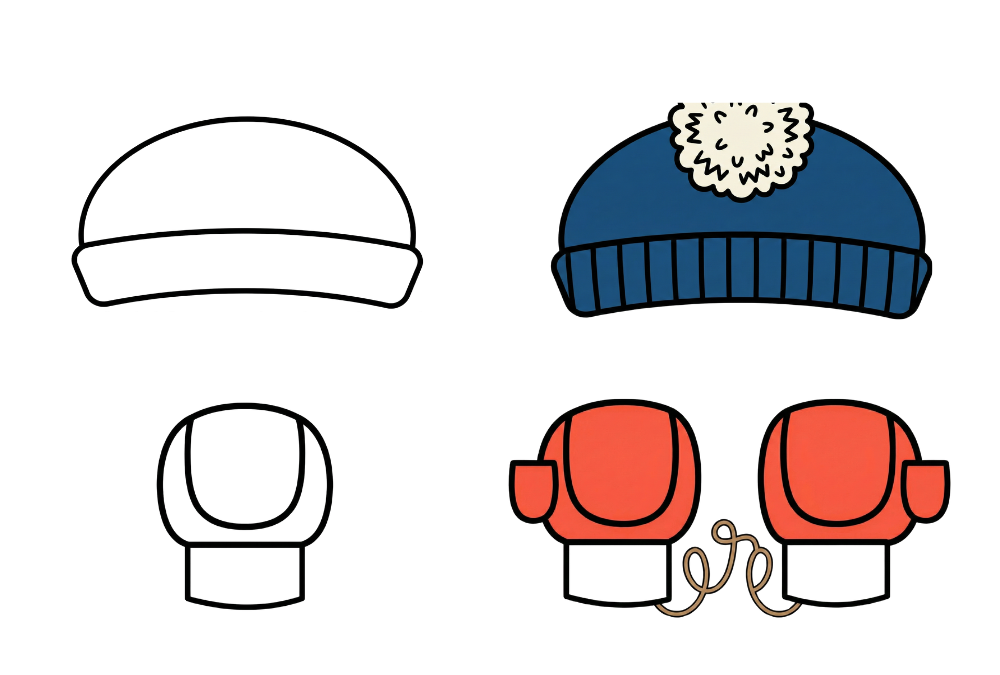
How to Draw Winter Hat and Mittens in 5 Easy Steps
Is it getting chilly outside? Can you see your breath in the air like a little dragon? That means winter is here. And when winter comes, it’s time to bundle up. But we aren’t just going to wear cozy clothes today we are going to draw them.
Welcome to the biggest, most fun, and super cozy drawing guide ever. Today, we are going to learn how to draw winter hat and mittens. Whether you want to draw a picture for a holiday card, decorate a sketchbook, or just have fun on a rainy afternoon, you are in the right place.
Getting Ready
Before we make a single mark on the paper, we need to gather our tools. Every great artist (that’s you) needs their trusty supplies. You don’t need anything fancy, but having the right tools makes drawing much easier.
What You Will Need:
- Paper: Any paper works. Printer paper, a sketchbook, or even construction paper. If you plan on painting later, try to use thicker paper.
- Pencils: A standard HB pencil (the yellow one you use at school) is perfect. It’s easy to erase and makes nice clear lines.
- An Eraser: This is your best friend. Mistakes are actually just “happy accidents” that help us learn, but sometimes we want to change a line. A big pink eraser or a white gummy eraser works best.
- A Black Marker: This is for “outlining.” Once you are happy with your pencil drawing, tracing over it with a black marker makes it pop off the page.
- Coloring Tools: Crayons, colored pencils, markers, or even watercolors. We want these hats to be bright and colorful.
Pro Tip: Find a comfortable spot to sit. Make sure you have good light so you can see your paper clearly.
How to Draw Winter Hat and Mittens (Step by Step)
Tutorial 1: Drawing the Classic Winter Beanie
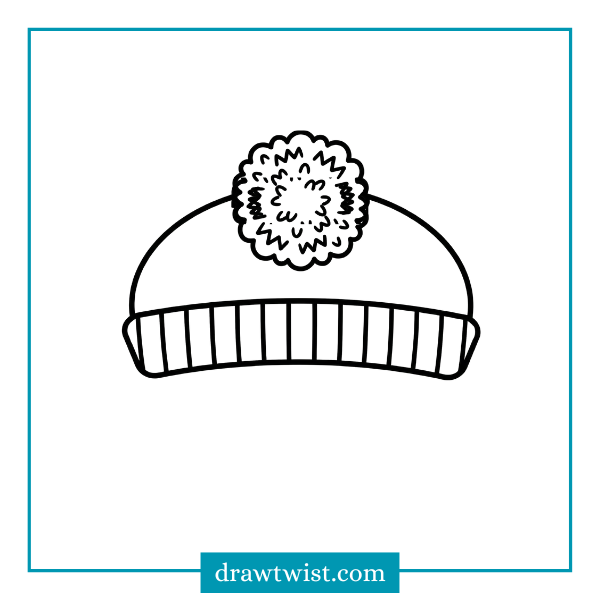
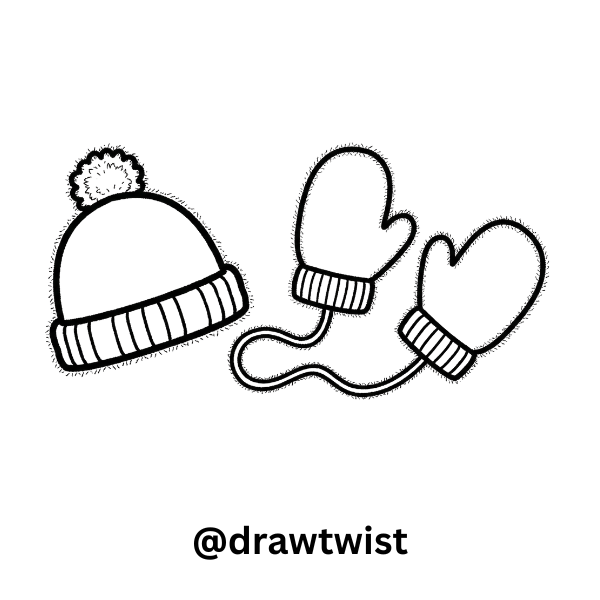
We will start with the most popular winter hat: the Beanie (sometimes called a toque or a stocking cap). This hat usually has a folded cuff at the bottom and a big fluffy ball (pom-pom) on top.
Imagine the Shape: Before we draw, think about the shape of a hat. It’s not a square, and it’s not exactly a circle. It looks a bit like an upside-down letter “U” or a gumdrop.
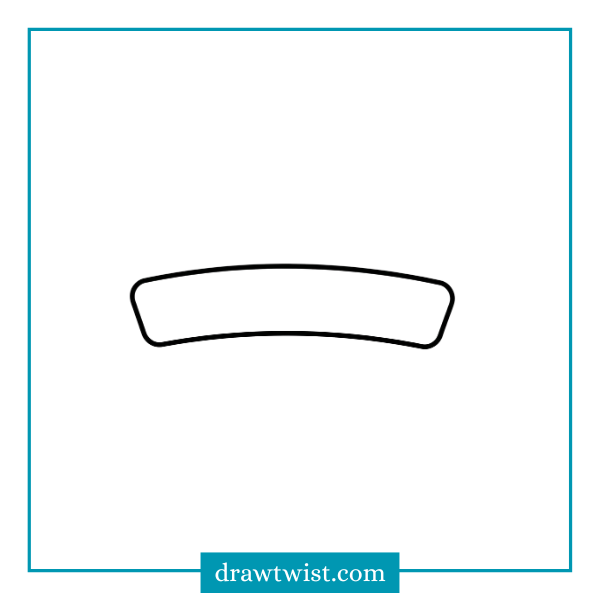
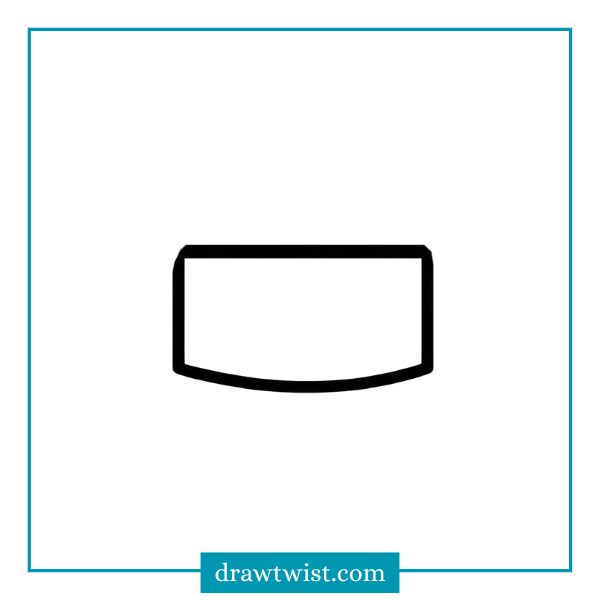
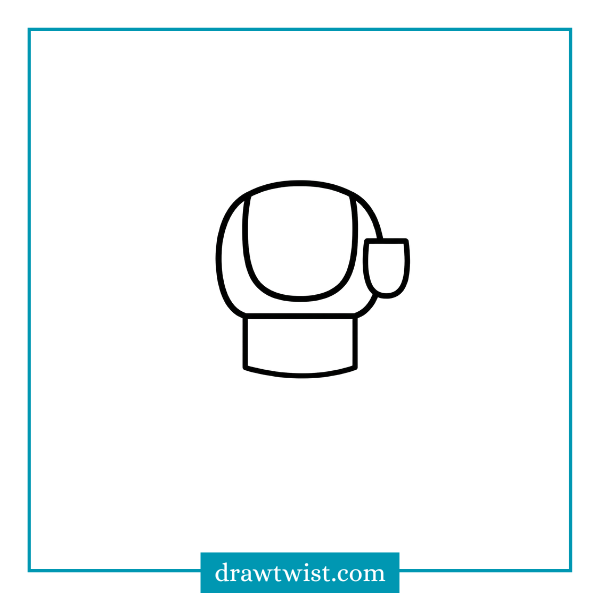
Step 1: The Cuff (The bottom part)
The cuff is the part of the hat that hugs your forehead to keep you warm.
- Draw a long, thin rectangle in the middle of your paper.
- Make it curved: Instead of straight straight lines, curve the top and bottom lines slightly downward. This makes the hat look like it’s round and ready to fit on a head, rather than flat like a pancake.
- Round off the corners so they aren’t sharp. Soft corners look cozier.
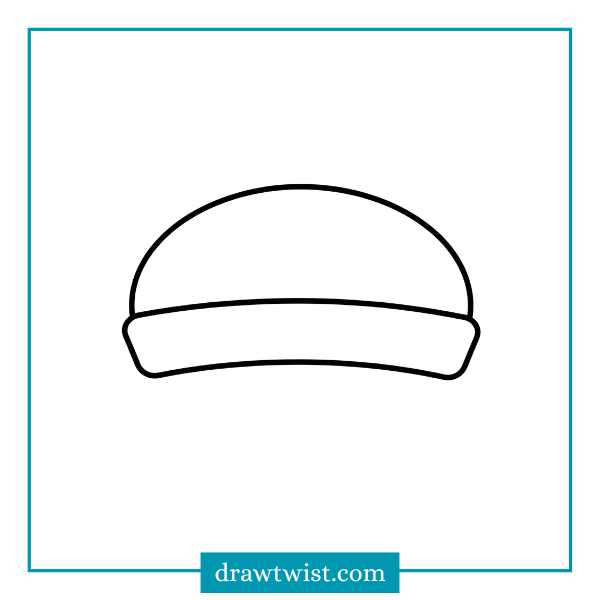
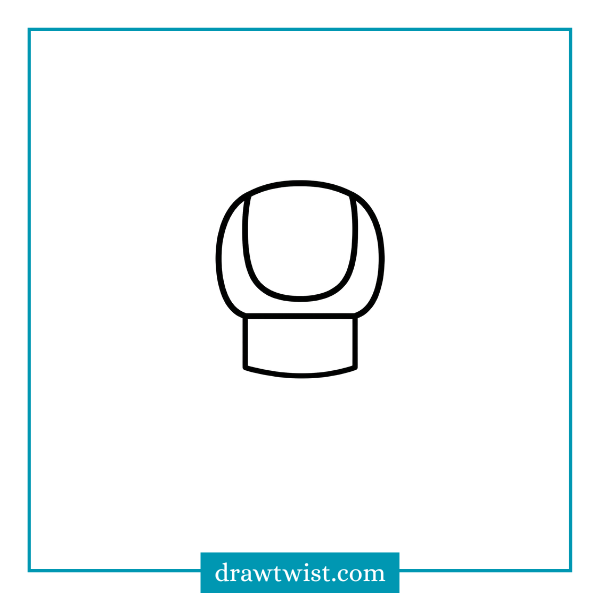
Step 2: The Dome (The top part)
Now we need the part that covers the head.
- Start at the top left corner of your cuff rectangle.
- Draw a big curved line that goes up, over, and comes back down to the top right corner of the cuff.
- It should look like a hill or an upside-down bowl sitting on top of your rectangle.
- Tip: If you want a tall, floppy hat, draw the hill really high. If you want a snug hat, draw the hill shorter.
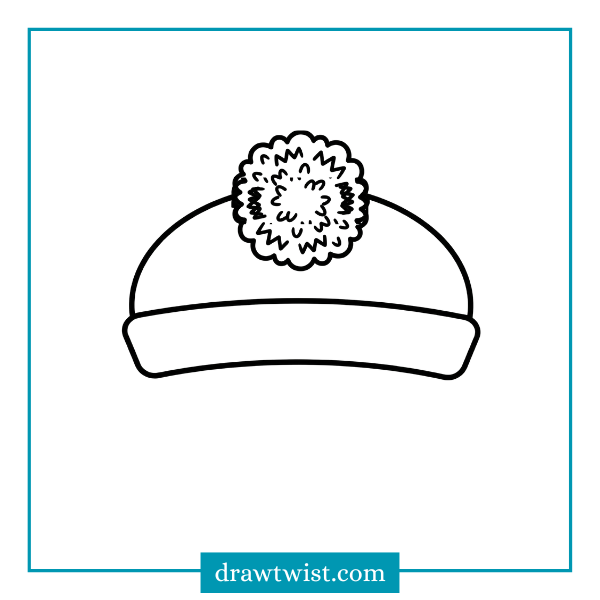
Step 3: The Pom-Pom (The fun part)
No winter hat is complete without a pom-pom on top.
- Right at the very top of your “dome” (the hill), draw a circle.
- Make it fluffy: Don’t draw a smooth line for the circle. Instead, use a zigzag line or lots of little “u” shapes all the way around. It should look like a little cloud or a sheep sitting on top of the hat.
- Erase the line of the hat that is inside the pom-pom so it looks like one solid piece.
Step 4: Adding “Ribbing”
Most winter hats are knitted. To show this, we add vertical lines.
- Go back to the cuff (the rectangle at the bottom).
- Draw straight lines going up and down inside the rectangle. Space them out evenly.
- These lines represent the stretchy fabric of the hat.
Checkpoint: Look at your drawing. Do you have a rectangle bottom, a hill top, and a fluffy cloud on the very top? Yes? Awesome. You just drew a hat.
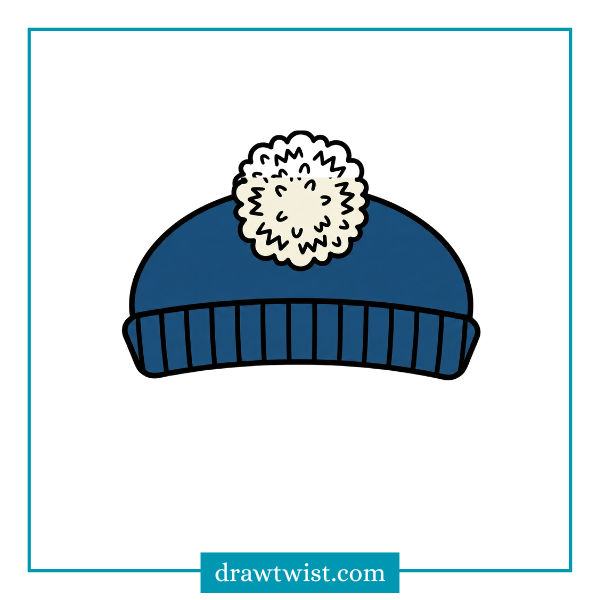
Step 5: Time to Color (Bring it to Life)
Now that we have our outline, it’s time for the best part making it colorful. You can use crayons, markers, or colored pencils.
Tutorial 2: Drawing the Perfect Mittens
Now that our heads are warm, we need to warm up our hands. Mittens are easier to draw than gloves because we don’t have to worry about all those tiny fingers. Mittens only have two parts: a pocket for the thumb and a big pocket for the rest of the fingers.
Step 1: The Cuff
Just like the hat, mittens usually have a stretchy part at the wrist.
- Draw a rectangle, but this time make it stand up a little taller (like a square with rounded corners).
- Curve the bottom line slightly to make it look round.
Step 2: The Hand Pocket
- From the top of your wrist cuff, draw a big curved line. It should look like a really tall upside-down “U”.
- This shape should be wider than the cuff. It looks a bit like a balloon attached to the wrist.
Step 3: The Thumb
- On the side of the mitten (you can choose left or right), draw a smaller “U” shape sticking out.
- Start the line from the middle of the big hand part and curve it outwards and back in.
- It should look like the mitten is waving “Hello!”
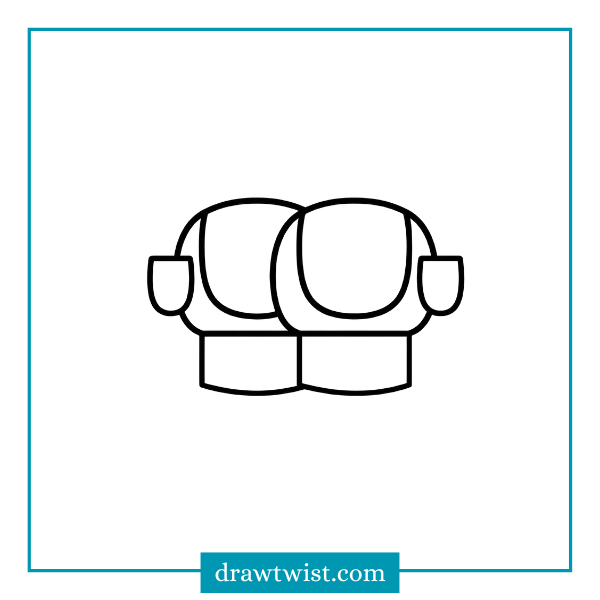
Step 4: The Second Mitten
A mitten gets lonely without its friend.
- Draw the exact same shapes right next to the first one.
- Mirror it: If the thumb was on the left side of the first mitten, put the thumb on the right side of the second mitten. This way, you have a left hand and a right hand.
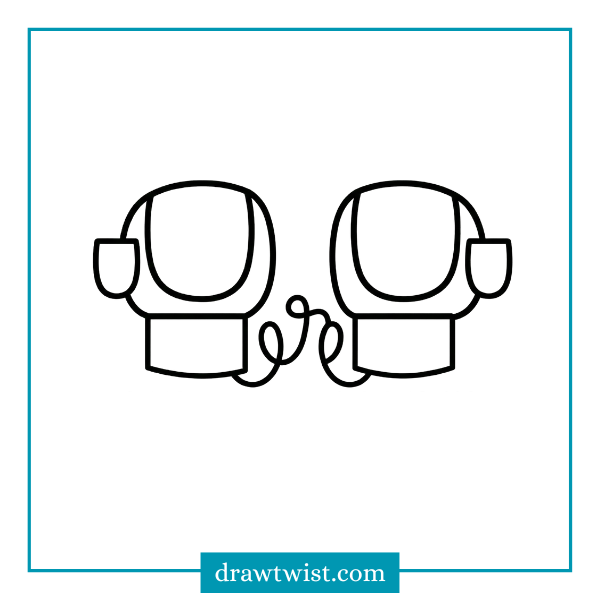
Step 5: The “Idiot String” (Optional)
Have you ever had mittens connected by a long string so you don’t lose them? This is fun to draw.
- Draw a long, wavy line connecting the cuff of the first mitten to the cuff of the second mitten.
- Make the line loop-de-loop for extra artistic flair.
Step 6: Color
You have drawn a perfect pair of mittens. Now let’s make them look warm and fuzzy with some color.

Level Up! Adding Textures and Patterns
You have the outlines, but now we need to make them look real. We want the viewer to feel like they could reach into the paper and touch the soft wool.
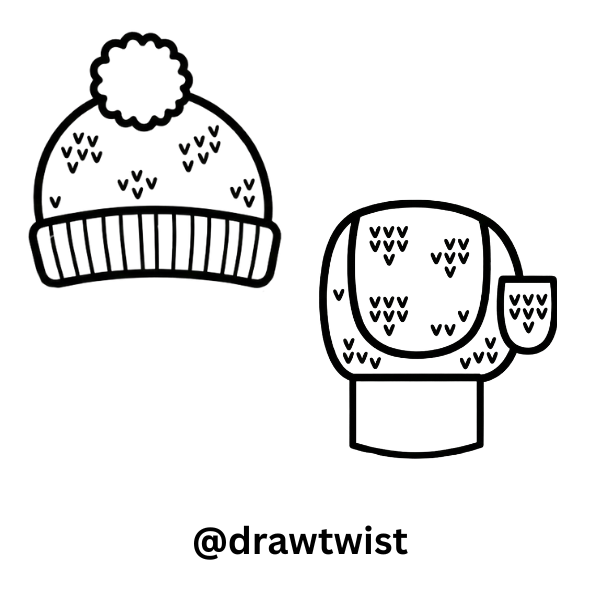
1. The “Knitted” Look
Knitted fabric is made of yarn loops. Here is a simple trick to draw that texture:
- Little ‘v’s: Inside the main part of the hat and mittens, draw tiny letter “v” shapes.
- Don’t fill the whole space. Just draw a little patch of “v”s here and there. This tricks the eye into thinking the whole thing is knitted without you having to draw a million lines.
2. The “Fuzzy” Look
Is your hat made of felt or fleece?
- Go over your outside lines (the outline). instead of a straight line, use very tiny, scratchy dashes.
- This makes the hat look slightly fuzzy and soft, rather than shiny and smooth.
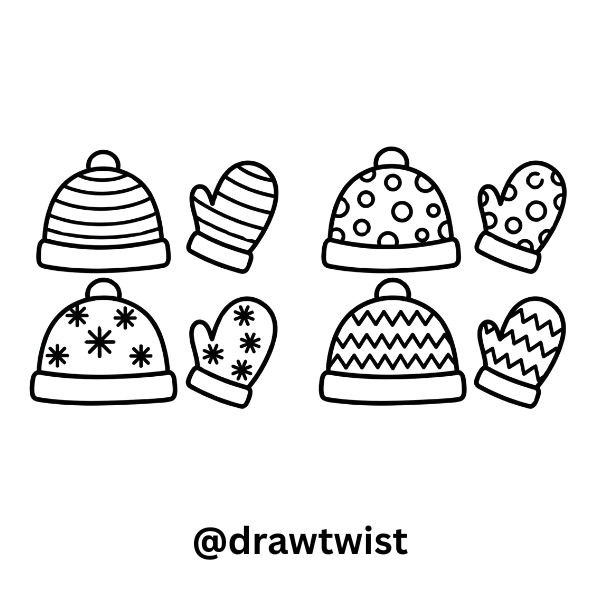
3. Patterns
This is where your imagination goes wild. You don’t have to leave the hat plain.
- Stripes: Draw curved horizontal lines across the hat and mittens.
- Polka Dots: Draw circles of different sizes all over.
- Snowflakes: Draw a simple “X” with a line through the middle (like a star) to make snowflakes.
- Zig-Zags: Draw a line that goes up-down-up-down like shark teeth.
Fun Variations: Santa Hats & Ear-Flaps
Maybe you don’t want a regular beanie. Maybe you want something festive.
Variation A: The Santa Hat
- The Furry Brim: Instead of a rectangle cuff, draw a long, skinny cloud shape at the bottom. This is the white fur.
- The Floppy Cone: Draw a triangle shape coming out of the fur, but make the top point tip over to the side. It should look like a triangle that is melting.
- The Pom-Pom: Draw your fluffy cloud circle at the very tip of the melting triangle.
Variation B: The Ear-Flap Hat (The Chullo)
This is the hat that covers your ears. It is super cute.
- Start with the Beanie: Draw the dome shape like normal.
- Add Flaps: At the bottom of the dome, on the left and right sides, draw two triangles pointing down.
- Strings: At the bottom point of the ear triangles, draw two wavy lines hanging down (these are the strings to tie the hat).
- Tassels: Draw little messy circles at the end of the strings.
Coloring Your Masterpiece
Now comes the splash of color.
Warm vs. Cool Colors:
- Warm Colors (Red, Orange, Yellow): These colors look energetic and cozy, like a fire. A red hat stands out beautifully against white snow.
- Cool Colors (Blue, Purple, Green): These colors look icy and wintry. A light blue hat looks very “Frozen” style.
Shading for Kids (Simple 3D tricks): Want to make your drawing look 3D?
- Pick a side for your light (let’s say the sun is on the right).
- Color the left side of the hat and mittens a little bit darker. You can do this by pressing harder with your crayon.
- Leave a little white spot on the top right. This is the “highlight” where the sun hits the wool.
Creative Ideas for Your Drawings
Now that you are a master of drawing winter gear, what can you do with this skill?
- Dress Up Animals: Draw a penguin, a bear, or even your own pet dog, and draw a hat and mittens on them. There is nothing funnier than a cat wearing mittens.
- Design Your Own Line: Take a piece of paper and divide it into 4 squares. Draw a different hat in each square. Congratulations, you are now a fashion designer.
- Holiday Cards: Fold a piece of paper in half. Draw a big pair of mittens on the front. Inside, write “Warm Wishes.” This makes a perfect card for family and friends.
- The Laundry Line: Draw a long line across your paper. Draw different hats, mittens, scarves, and socks hanging from the line with clothespins. It makes a beautiful winter scene.
Wow, Look at what you created. You started with a blank piece of paper, and now you have a cozy, colorful, beautiful winter collection.
Drawing is all about practicing and having fun. If your first hat looks a little lopsided, that’s okay, Maybe the wind is blowing it? Keep practicing your circles, your textures, and your coloring.
The best part about drawing winter clothes is that you can invent any pattern you want. You can make a hat with pizza slices on it, or mittens that are rainbow-colored. The only limit is your imagination.
So, keep those pencils moving, stay warm, and keep creating.
Read More: Winter Animal Doodles, How to Draw Sweater Doodle, Winter Hat and Mittens Doodle Ideas

![29 Halloween Doodles Anyone Can Draw [Cute & Spooky]](https://drawtwist.com/wp-content/uploads/Halloween-Doodles-768x518.png)
